↓
 

StudioMicZone

Microphones and Recording Techniques for Small and Home Studios.

Studio Mic Zone - Microphone and recording techniques for small and home studios.
  • Home
  • Terms of Use
  • Privacy
  • Contact Us
  • About StudioMicZone
  • About the Blogger

Post navigation

← Older posts
Newer posts →

Growth of the Microphone Industry

StudioMicZone

The growth of the microphone industry and the growth of the home recording industry are entirely intertwined. The home recording revolution began in the 1970s with Tascam Model 10 console and Series 70 recorders. This equipment made home recording affordable and also spawned the opening of many small commercial studios. I opened my studio in 1973 and benefited from the new, lowcost, electret condenser microphones hitting the market.

At the beginning of the home recording revolution, there were only 10 – 15 manufacturers making studio-quality microphones. According to the Recording Hacks website, which contains probably the most comprehensive listing of studio-quality microphones on the web, over 151 manufacturers were making microphones for recording studios in January of 2020.

Frank Sinatra at Columbia Records recording on an RCA 44B ribbon microphone.
Frank Sinatra at Columbia Records recording on an RCA 44BX ribbon microphone.

The manufacturers got it right the first time. Classic microphones from the 1940s, 1950s, and 1960s were made exceptionally well and had a superb performance. The RCA 44BX and 77DX,  AKG C12, Neumann U47, U67, and U87 are still very desirable today and bring high prices, not only because they are collectible, but because they always produce excellent results. These classic microphones were used on many hit recordings, not primarily by choice but because they were the only ones available. At that time, the selection of microphones was minimal.

Progress in microphone design over the past 75 years has been one of evolution rather than revolution, with only a few significant innovations.

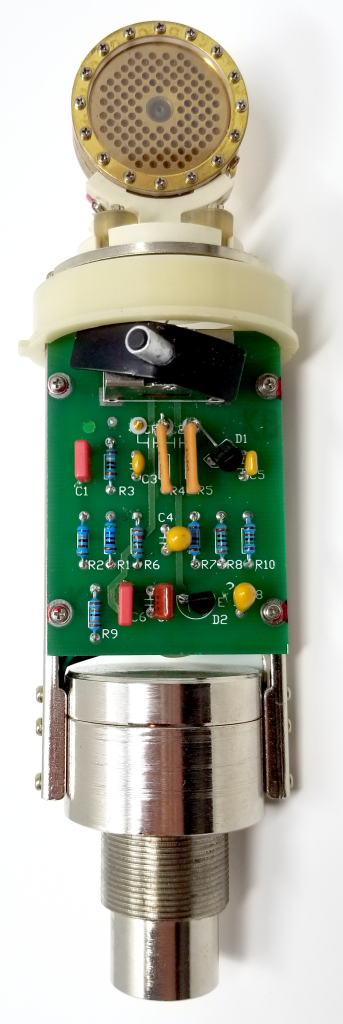
The first notable innovation was the invention of the FET (field effect transistor). Condenser microphones required a preamplifier in the microphone body because of the high impedance of the capsule. A vacuum tube and the associated high-voltage and filament power supply were needed for that preamp.  The FET allowed manufacturers to get rid of the large high voltage tube supply and miniaturize the components in condenser microphones. Vacuum tube condenser microphones were replaced by new FET microphones that were battery powered.

The next innovation was the implementation of phantom power to power the microphone over the standard 3-wire balanced cable. The expensive batteries became an option and soon disappeared as phantom power became the norm in the 1980s.

The innovation of the electret condenser microphones allowed for smaller microphones because their permanently polarized diaphragm eliminated the need for an external bias power supply. The elimination of the bias supply resulted in a cost reduction and a smaller microphone. Lavaliere microphones got more compact, and low-cost electret condenser microphones hit the rapidly growing home recording market. My first condenser microphones were a pair of Sony ECM-22P microphones I purchased in 1973. They still work well.

The steady progress in dynamic microphones and ribbon microphones was given a shot in the arm with the discovery of the metal compound, neodymium. Neodymium was discovered independently by General Motors and Sumitomo Special Metals in 1984. Magnets made from this metal are the material of the smaller magnets and higher outputs in dynamic and ribbon microphones because of their intense magnetic fields. Neodymium spawned a new generation of more compact ribbon and dynamic microphones.

During that time there was a continued improvement, re-design and re-engineering that produced a continuous forward movement in the quality and features of studio microphones.

Seventy-Five years of design experience plus precision CNC machining equipment automated the production of many microphone parts, bringing the cost down and providing considerably improved quality control. The takeaway here is that because of significantly increased sales volume and lower automated manufacturing cost; there is a greater variety of quality microphones with many options available at reasonable prices than ever before.

Posted in Choosing & Buying Microphones, Classic & Antique Microphones, Microphone Fundamentals, Other

5 Things You Always Need to Have On Hand in the Studio

StudioMicZone

Keeping a recording session running smoothly is essential. These are items not recording equipment, but you’ll need them in almost every recording session. Even if you are working in the studio alone, having these things on hand close by allows the flow to keep going and keeps you from having to run out and search for the item somewhere else in the house.

  1. Hydration. Human beings need water, especially ones that are singing or playing music. Always have bottled water on hand. It doesn’t even have to be cold, just wet. Cold liquids are usually not helpful for singing and speaking voices.

  2. Tissue. Everyone always asks for tissue, especially during cold and allergy season. Keep a couple of boxes around not only for their intended use but also for spills and cleaning eyeglasses

  3. Sharp Pencils with erasers. People often need to make notes and corrections on scripts and music. Part of my prep for a recording session is to sharpen a bunch of pencils. I have an electric pencil sharpener within reach in the control room. A few other basic office supplies might come in handy also, especially scotch tape and Post-It notes.

  4. Over-the-counter meds. Pain relief meds such as Acetaminophen are often requested. Cough drops, Claritin, and antacids might be other good things to have in the drawer depending on your own needs and those of your clients.

  5. Clip-on lights for music stands. Lighting in most studios is uneven, especially home studios. I often found myself positioning musicians for adequate lighting rather than the best sound. The advent of clip-on LED battery operated lighting for music stands has been a real boon. Most of them run off of an AC adapter if you don’t want to keep replacing batteries. You can also get them with rechargeable batteries.

Posted in Hints and Tips, Other

Are You Capturing Or Creating?

StudioMicZone
Two stereo pairs and one stereo mic set up to do fail-safe recording of a choir concert.

Before you set out to do a recording, it is a good idea to determine what your objective is. Are you capturing a performance, or are you creating a recording that didn’t happen in a single time or place?

Back in the 1950’s when stereo high fidelity recordings and equipment became available, the ultimate purpose was to re-create the concert experience in your living room. Engineers of that period made their recordings with a stereo pair of microphones and spent significant time positioning the microphones, but did little post-processing.

After Les Paul’s experiments with overdubbing and multi-track tape recorders, multi-track recording became the norm in many studios, where pieces of the same performance would be recorded at different times and possibly in different places.

If you are capturing a live performance in the studio or on-location, the equipment, techniques, and microphones used may be very different than a multi-track, highly produced recording. In capturing a live performance, the acoustics of the recording space may be an essential factor.

If your goal for your studio is only to capture live performances, your equipment list and choice of microphones is very different from that used “in-studio.” And if you are doing both types of recording, your location list of equipment is different from your list of equipment in the studio. You’ll need a portable recorder, long microphone cables or a snake, one or more very tall microphone stands and a stereo microphone or pair of SDCs and a stereo microphone mount to put them both on a single stand in the proper configuration.

Recordists usually don’t choose LDC microphones for concert recording for multiple reasons. They are difficult to support on a tall stand, and they tend to have a “colored” response, which might be useful in the studio, but not for a whole orchestra or choir. The usual microphones used are a pair of SDC microphones or a stereo microphone of some type. In some cases, a pair of bidirectional microphones (possibly ribbon) in Blumlein configuration or possibly an M-S pair will be used. Microphones with a flat frequency response are the norm.

I’ve seen jazz recordings done with a single, ribbon, figure-8 microphone like an RCA 44 with the musicians arranged around the front and back of the microphone to achieve a proper balance. This retro configuration emulates the way studios recorded jazz groups in the 1940s and 1950s.

If you are capturing a live performance of a rock band and close miking every instrument, the techniques and equipment are similar to a studio produced multi-track recording, other than that you will be carrying a large amount of equipment.

Part of the technique is the positioning of the microphones and musicians to achieve a proper balance. This type of recording usually involves a bit of pre-planning, because once the performance happens, it’s nearly impossible to change the balance between each of the different musical sections. Often, choir concert and orchestra directors set the group up configured for convenience or visual appeal and not a good sound.

Posted in Miking Techniques and Recording

Inside the New RØDE NT1 Microphone

StudioMicZone

Microphone manufacturers seem to have a thing about being confusing about model numbers. The Shure 55 has been around since at least the 1940s and in many different incarnations from the original “fat boy” to the latest 55SH with its Unidyne 3 cartridge. AKG may have set a record with the many different versions of the venerable 414.

RØDE is no different with the NT1 which was their first studio condenser microphone. They then developed the NT1A. and now have released their new NT1 which has little in common with the original NT1 except for the headbasket. The new NT1 is far superior to the old one with a self-noise of just 4.5 dbA and a very smooth response as opposed to the original one’s hyped high-end response.

I see confusion on the forums all of the time where people think the new mike is the same as the old, a Chinese import with a hyped high-end, when in reality this latest version of the mike has a custom designed, edge-terminated capsule, and the capsule and the microphone are all built in RØDE’s factory in Australia.

My dislike for the name aside, this microphone is an amazing value and I would highly recommend it. It needs to be in your microphone locker.

We’ll take a look inside the new RØDE NT1 in this first new video of our “Inside” series.

Posted in Microphone Reviews, Microphone Teardown & Repair | Tagged Condenser Microphone, RODE, RODE NT1

Groove Tubes GT-55 and Sterling ST-55 Mod Using the Micparts T84-55 Circuit Kit

StudioMicZone

I have always liked the Groove Tubes resonator capsule design since it adds diversity to my mike locker. Over the past couple of years, I have acquired a couple of GT-55s and the successor to it, the Sterling ST-55, as they became available on eBay.

So, when micparts came up with the T84-55 circuit kit, I jumped at the chance to have a microphone with the resonator capsule and upgraded electronics and was near the beginning of the line to get the new kit. I decided to video the modification process in case anyone would like to see what is involved in a mike mod if they are anticipating one or just curious.

Here’s a video of the whole process. Micparts does a superb job on their instruction manuals with step-by-step instructions and color photos. If you have the ability to solder and can follow instructions, the process should yield success.

The micparts T84-55 circuit kit is available on the micparts website.

Posted in Microphone Modifications | Tagged Groove Tubes GT55, MicParts T84-55, Microphone-Parts T84-55, Sterling ST55

Even The Jackals Album Finished

StudioMicZone
Even the Jackals new album, Sink or Float

Almost a year in progress, the Even the Jackals album, Sink Or Float, was finished this week and released at the House of Blues in Chicago on September 28. Congratulations to Danielle, Bill, Seth and Tommy on a job well done. This album was the ultimate test of the new studio and the new space performed beyond all expectations. It was a long project and worth every minute of time that we put into it. It also makes me happy to know that every minute of construction put into the new studio paid off well, also.

Even the Jackals at House of Blues September 28, 2017

I am amazed at what can be accomplished in a home studio in a somewhat non-ideal space. I learned a lot in both the studio construction and in the production and recording of this album. thanks to the Jackals for having faith in me and for being part of this new adventure.

I’ll be sharing some of this knowledge in future blog posts. The opportunities for home recording are endless. Learn your craft and keep producing!

Posted in Miking Techniques and Recording, Other, Studio Construction

Cascade MX-22 and MX-33 LDC condenser microphones.

StudioMicZone

Here are the photos of two older Cascade LDC microphones. The MX-22 is a cardioid only microphone while the MS-33 is a multipattern mic. I acquired the MX-22 from eBay and shortly thereafter acquired a pair of MX-33s on eBay. The MX-33s were from the estate of the late Gary Loizzo who was the lead singer of The American Breed, formed in the mid-1960s. Loizzo then went on to start his own recording studio called ‘Pumpkin Studios’ in the early 70’s and become a two-time Grammy-nominated recording engineer. 

There is absolutely no information on them from Cascade. I assume that they were imported from China and were a generic microphone that was customized. I tried a little more research and discovered that they were built by Feilo in China. Feilo describes their services as follows: We specialize in contract manufacturing of microphones for distributors, retailers and manufacturers seeking to private label our products or outsource their manufacturing. 

The MX-22 appears to be a Feilo Z-2200 and the MX-33 appears to be a Feilo Z-3300. The microphones appear to be identical, but I don’t know if any of the components had different specs. According to Matt McGlynn at Recording Hacks, the MX-33 and Feilo Z-3300 are identical to the Advanced Audio CM-87, at least from looking at the pictures. Both of the microphones feature discrete class-A circuitry and a transformer-coupled output. They have a 1.07″ diameter K67 center-terminated type capsule.

The mikes are packaged in an aluminum case and come with a shockmount.
Here are the Cascade MX22 and MX33microphones.
MX22 Rear
MX22 Front
MX33 Front
MX33 Rear
Posted in Microphone Teardown & Repair

Electro-Voice 726 Cardyne I Microphone

StudioMicZone
Electro-Voice 726 Cardyne 1 Microphone

Electro-Voice 726 Cardyne 1 Microphone

I’ve had this Electro-Voice mike in my collection for a number of years, but never bothered to test it since it had an Amphenol MC-3 connector on it and I didn’t have the proper cable. But, I acquired a box of Amphenol connectors recently, so I thought it was time to check out this classic mike.

This is a large microphone, comparable in size to my Shure 556 “fat-boy, Elvis” microphone. It weighs in at about 2 ½ pounds. The best I can tell, it first appeared on the market in the late 1940s.

According to the EV spec sheet:

The CARDYNE microphones are cardioid unidirectional dynamic types operating on the E-V Mechanophase principle. They utilize dual phase shifting diaphragms to produce a high degree of uni-directivity at all frequencies.

The CARDYNE models are designed for extremely accurate reproduction of music and speech. The directivity gives it unusual versatility in increasing the working distance from the user by reducing reverberation and acoustic feedback. High output provides an excellent signal-to-noise ratio for broadcasting studio pick-up.

My unit is in excellent physical condition externally, but I decided to open up the mike to make sure the insides were OK before wiring up the new cable. Two screws on the back loosened the rear of the case and two screws under that loosened the front cover.

Electro-Voice 726 Cardyne 1 Microphone, internal back view.

Electro-Voice 726 Cardyne 1 Microphone, internal back view.

The insides were clean and not corroded, but all of the rubber shock-mount material had hardened and some of it turned to powder. Since the cartridge assembly just flopping around inside the case, I needed to replace all of the shock-mount material.

This microphone achieves its cardioid directionality by means of a resonance chamber that is part of the dynamic cartridge assembly. This assembly rests against a block of sponge rubber that is about ½ in. thick, 1 inch high, and two inches long. I was easily able to cut a replacement piece from a piece of ½ rubber that I had and glued it into place. There were a couple of bumpers on the front of the cartridge assembly that rested against the front of the case. These I replaced with pieces of self-adhesive rubber that I cut from a sheet that I bought from a craft store.

The shock mounts that held the back of the resonator to the mike frame were not as simple. What I needed were eight ½ inch diameter rubber washers, ¼ inch thick, with a ¼ inch hole in the center. I used a hole punch to punch the ½ circles out of a sheet of rubber, and then punched a ¼ inch hole in each one of those. These were close enough in size that I was able to re-assemble the shock mounts with the new rubber pieces, tighten the screws, and verify that is worked properly.

Electro-Voice 726 Cardyne 1 Microphone, internal front view.

Electro-Voice 726 Cardyne 1 Microphone, internal front view.

I double-checked the wiring inside of the mike to make sure that I hadn’t broken any wires, and then put the mike back together.  I didn’t have any silk or thin foam to replace the windscreen inside the shell, but it was in fairly good shape, so I’ll save that for a later date.  I then used my Dremel tool with a brass brush to remove oxidation from the exterior of the mike, and it cleaned up nicely.

I wired up a new cable for the mike to go from the Amphenol connector on the mike to a standard male XLR connector. I set the impedance switch on the back of the mike to “Low” and plugged the mike in. It worked.

Amphenol MS-3 connectors.

Amphenol MS-3 connectors.

Then, into the studio for some comparative recordings between this E-V mike and the Shure 556. The E-V is brighter and has a higher output than the Shure. Both mikes seem to have a significant amount of distortion. I am guessing that the capsules in both mikes are showing their age and may have some damage. Replacement capsules of the same type are not available. I could upgrade to a newer capsule, but then they would no longer be vintage mikes.

So, I’ll just be on the lookout for NOS capsules on eBay. There was a NOS capsule for a Shure 55S on eBay this week, but the mounting is entirely different that the 556, so I passed on it even though it is probably the same capsule. These mikes will be mostly for decoration, except for that occasional funky recording project that pops up now and then.

What is interesting is the amount of mechanical apparatus that was needed back in the 40s to create a directional mike. My new Electro-Voice N/D 468 microphones provide hyper-cardioid directionality and great sound in a package that has probably 1/8 the size of the old 726. We’ve come a long way in the past 70 years!

View of internal wiring.
Internal view of the microphone showing the wiring of the impedance switch and the transformer.
Posted in Classic & Antique Microphones, Microphone Teardown & Repair | Tagged Dynamic Microphone, Electro-Voice, Microphone

The “Best” Audio Software

StudioMicZone

The question, “What is the best audio software?” often appears on recording forums, and I am frequently asked the same question from people who are new to home recording. I usually respond, “The one you know how to use.” There is a lot of truth here because your proficiency with the software often outweighs the features that it might contain. Your most significant investment isn’t the cost of the software, but the “learning curve,” the time you will invest in becoming proficient in the software and the loss of productivity while you are in the learning mode.

If you are just beginning, it is essential to ask what you will be doing with the software.

  • Multitrack Production – live recording

  • Multitrack Recording – sequenced and MIDI production

  • Stereo and mono editing and processing

  • Special purpose software such as CD authoring

So first choose the type of program you need, and then make your decision in that category. A significant factor in that choice will be, is your studio equipped with Macs or PCs? Most major software will run on both platforms, but some are specific to either Windows or Mac.

Make sure you do your homework in researching each program. In each category of application, you will find a few leaders that dominate. Pick the one that has the features that best match your needs. There is no “best” program, generally speaking. But there may be a “best” one for your specific needs.

In our case, for our multitrack recording and mixing program, we use ProTools. We often work on projects where original tracks were recorded in another studio and sent to us for overdubs and mixing, or we need to have tracks recorded in another studio outside of the Chicago area. ProTools is probably the most universally used multitrack recording program, and most major studios will be using it, so we chose the program first of all for compatibility.

For narration, audio-for-video processing, and mastering, we use Sound Forge, which is a mature, well-designed, and full-featured program. Sound Forge was one of the first digital audio programs that I used. I am proficient with it, and it serves my needs well. There are other good programs out there, but there is no reason to switch.

Posted in Mixing, Software | Tagged Audio Software, Recording Software, Software, The question

My First Microphone Build

StudioMicZone

Microphone kits are readily available these days, at least for condenser and ribbon microphones, but that certainly wasn’t the case in the early 1960s. I was what today we would call a geek in my younger years, so when I saw the ad for the American Basic Science Club kits in the back of an electronics magazine, I talked my parents into subscribing me to the set of 8 monthly kits for my tenth birthday.

James S. Kerr created the American Basic Science Club in 1957 and operated the company into the early 1980s. The kits were elegantly designed so that you could reuse many of the items for different experiments and it certainly was a wonderful introduction to science and technology with a lot of emphasis on learning the basic principles of electronics, optics, and many other areas.  The ad below shows all of the different experiments that one could do and the kits evolved and expanded over their lifetime with the addition of an analog computer later on.

American Basic Scienc Club magazine ad from the early 1960s.

American Basic Science Club Ad from the early 1960’s.

These kits contained a lot of electronics projects with vacuum tube circuitry. Mine used three octal tubes, but later kits used miniature tubes. The company never made the transition to solid state circuitry.

One of the projects was an AM radio transmitter, and that project required a microphone, so included in the kit were parts to build a carbon microphone from scratch. I built it, it worked, and so began my saga with microphones and audio. I don’t have any of the pieces of the original kits except maybe for the tuning capacitor.

A few years ago, the nostalgia bug bit and I started buying some of the American Basic Science Club kits on eBay as they showed up for sale, fortunately before the prices shot up. I managed to acquire most of the whole set at that time. I keep some of the pieces on display, but most of the kits are still in their original boxes.

Parts and instructions for the 1960's carbon microphone kit. from American Basic Science Club.

Parts and instructions for the 1960’s carbon microphone kit.

 Metal diaphragm and capsule of carbon granules.

Metal diaphragm and capsule of carbon granules.

I thought it might be fun to construct that microphone again, so I started rummaging through the boxes and managed to find all the pieces to assemble the same mike that I had built 55 years earlier. The instructions were very basic, and it was certainly a little bit of a challenge. I wondered how I was able to accomplish it when I was only ten years old, but I probably had a bit of help from my dad who could build just about anything.

A carbon microphone works as a variable resistor. Carbon grains are loosely held in a small chamber between two metal contacts. One of the contacts is attached to the diaphragm of the microphone, and the vibrations of the diaphragm from sound move the carbon granules and vary the resistance at the vibrational rate. A small DC bias current is passed through the microphone, and thus a varying voltage is generated. If you hook a carbon microphone, a headphone and a battery in series, you’ve built a simple telephone.

Cavity in the carbon microphone handle that holds the carbon granules, ready to be filled.

Cavity that holds the carbon granules, ready to be filled.

The body of this microphone was stamped out of masonite. The hole in the handle was the chamber that held the carbon particles. A tinfoil layer covered the bottom of the hole and contacted the carbon granules. A screw head attached to the diaphragm made contact with the other end of the granules.

There were few instructions, and I needed to rely on the drawing for most of the assembly. The screw head from the diaphragm passed through a little square of plastic bag that was glued across the top of that cavity to keep the carbon granules from leaking out. The type of glue wasn’t specified, and I kept choosing the wrong kind and softening the piece of plastic bag and having the carbon grains leak out. I finally used a piece of double-stick tape to attach the plastic bag, and ended up with a non-leaking microphone.

I applied a 9V bias to the microphone through a resistor and coupled the signal from the microphone to the line input of an amplifier through a capacitor.

And just like the first one, I had a working microphone. Not exactly hi-fi, not even telephone quality, but able to reproduce understandable speech. I still find it amazing that you can build a working microphone with the simplest of parts and basic hand tools.

The completed, working, American Basic Science Club carbon microphone kit.

The completed, working, carbon microphone kit.


Posted in Microphone Fundamentals, Other | Tagged Build Microphone, Carbon Microphone

Post navigation

← Older posts
Newer posts →

Visit us on:

Search

Categories

  • Audio For Video
  • Audio Fundamentals
  • Choosing & Buying Microphones
  • Classic & Antique Microphones
  • Hints and Tips
  • Microphone Accessories
  • Microphone Fundamentals
  • Microphone Modifications
  • Microphone Reviews
  • Microphone Teardown & Repair
  • Miking Techniques and Recording
  • Mixing
  • Monitoring and Listening
  • Other
  • Podcasting
  • Software
  • Studio Construction

Archives

  • March 2020
  • February 2020
  • January 2020
  • December 2019
  • November 2019
  • October 2019
  • September 2019
  • August 2019
  • July 2019
  • June 2019
  • May 2019
  • April 2019
  • March 2019
  • February 2019
  • January 2019
  • December 2018
  • October 2018
  • August 2018
  • June 2018
  • April 2018
  • February 2018
  • December 2017
  • November 2017
  • September 2017
  • January 2017
  • December 2016
  • November 2016
  • October 2016
  • August 2016
  • July 2016
  • June 2016
  • May 2016
  • February 2016
  • January 2016
  • December 2015
  • November 2015
  • October 2015
  • September 2015
  • August 2015
  • July 2015
  • June 2015
  • May 2015
Copyright © 2025 by Norwest Communications Inc. All Rights Reserved. - Weaver Xtreme Theme
↑