↓
 

StudioMicZone

Microphones and Recording Techniques for Small and Home Studios.

Studio Mic Zone - Microphone and recording techniques for small and home studios.
  • Home
  • Terms of Use
  • Privacy
  • Contact Us
  • About StudioMicZone
  • About the Blogger

Post navigation

← Older posts

Welcome to the StudioMicZone!

StudioMicZone

We’ve designed StudioMicZone as a resource for owners of home studios and small commercial studios that operate with limited resources and in non-ideal spaces. Here’s what we  can help you with:

  • How to get the most out of your small or non-ideal studio space.
  • How to choose microphones and build your mic locker.
  • How to use microphones.
  • How to make great recordings with limited resources.
  • Microphone repair and modification.
Posted in Other

Microphones – “Good” and “Bad”

StudioMicZone

As you will see in the next few posts, there are many ways to classify microphones. You can categorize them by type: dynamic, ribbon, and condenser. You can also group them by directionality: omni, cardioid, and figure 8. Some people would also group them as “good” and “bad.” Of course, we all want good microphones and would like to avoid the bad ones, but the answer to the question is extremely subjective.

Usually, the question implies, “What is the cost of” a good microphone. The answer to that is $100.  The Shure SM57 is probably the most popular microphone used in recording studios. It appears in almost every studio’s mic locker, and usually in multiples. The SM-57 retails for around $100. The answer is also $3500. This is the cost of a Neumann U87, which appears in all major studios and has been used on countless hit songs. So, it isn’t about price.

Astatic Corporation in Conneaut, Ohio, built a little green bullet-shaped crystal microphone in the 1940s called the JT-31. Crystal microphones are rarely used today because of their poor frequency response and distortion. The JT-31 was used as a Public-Address and communications microphone. It sounded terrible by today’s standards but became extremely popular among blues harp players. It was lightweight, cupped in the hands easily, and distorted the sound (in a pleasing way) when played through a tube amplifier. So if you are a harmonica player, it is a good microphone. So, “good” depends on your use.

The Neumann U87AI is a $3500. microphone. It has a self-noise level of 12 dB(A). The $250. RØDE NT1, which sells for about $250. has a self-noise of only 4.5 dB(A), which is 7.5 dB better than the Neumann. This is a significant amount. If you need a quiet microphone, buy the RØDE. “Good” depends on what specification is essential to you.

I could go on here, but I hope you can see that what is “good” is very subjective.  Much depends on what your needs are. In general, microphones of any type, condenser, dynamic, and ribbon, at the very bottom of the price range, have compromised build quality and poor quality control.  But that changes quickly as the microphones go up in price. Because of modern manufacturing methods and the precision of computer-controlled machines, the cost of manufacturing a great microphone has diminished considerably. Plus, the economies of scale kick in as the home recording market has exploded in the past 25 years, and the volume of quality recording microphones has increased exponentially as well. As an electrical engineer, I don’t see anything in the build or components of most microphones that justifies a price of over $1500.

The differences in quality between a $500. microphone and a $3500. microphone are subtle. But there is intangible value in knowing you are buying the best. There is considerable psychological value in using the model of microphone that studios have used for years to record many classic hits.  And what is that intangible value? Significant since many people are willing to acquire microphones for over $1500.

Consider this, a $40. crystal-controlled Timex watch is four times as accurate as a $3500. Rolex. But some people gladly spend for the Rolex because it offers them something more than the ability to keep precise time.

Posted in Choosing & Buying Microphones, Microphone Fundamentals

Microphones Operate in a 3-Dimensional Space

StudioMicZone
3-Dimensional Microphone

Microphones are arguably the most critical piece of equipment in the studio because they pick up the vibrations in the air that we know as sound and convert it to an electrical signal that you can record manipulate and reproduce. They are the interface between the physical world of sound and the world of recorded audio. Any discrepancies in the fidelity of the microphone become part of your recording.

 It is essential to understand that microphones operate in a 3-dimensional space. It is also important to realize that there are no point sources of sound and that the sources we record have a physical size. The sound radiates from that whole physical source, and different sounds may radiate from different parts of it.

Consider an acoustic guitar. The guitar has a physical size of about 3 feet long, a foot and a half in width, and a thickness of six or more inches. Sound radiates from the whole body of the guitar, a different sound comes out of the soundhole, the strings radiate another sound, where the fingers pluck or strum the strings is one more sound, and the fingers of the other hand sliding along the fretboard produce a separate sound.

Imagine the microphone as a mixer that combines all of these sounds. Depending on the characteristics of the microphone, its directional pattern, and how we position it in 3-D space, it picks up a different mix of all these sounds. The signal coming out of the microphone cable is one-dimensional. Thus, the output of the microphone is the sum of all of those different sounds. They are processed as a single sound by any inline processing or in the DAW.

But we’re not done yet; our imaginary mixer has additional channels! Besides the different sounds coming from the guitar, there are sound reflections off of the floor and the ceiling. There’s sound reflected from the studio walls, noises occurring in the studio, and the sounds of the guitar player breathing and moving around. And if other instruments are being played at the same time, there is leakage from those. All of these sounds mix with the music from the guitar.

You can get more room sound by moving the microphone away from the guitar or less room sound by moving it closer. You can change the sound of the guitar by pointing your microphone at different parts of the guitar. And your choice of microphones affects the balance of all of these sounds. This whole mix then comes out of the microphone cable as a single monaural signal.

This signal coming out of the microphone cable is one-dimensional, a final mix. You can’t change the balance of the mix in post-production. Any effects or processing that you do affects that whole mix of guitar and room sounds. That is why microphone choice and positioning are so critical.

Posted in Microphone Fundamentals, Miking Techniques and Recording

Decibels

StudioMicZone

You must have a good understanding of decibels as well as a feel for the volume difference the term represents. Decibels are a term used to represent the intensity or volume of a sound, the gain of an amplifier, the amount of boost or cut of an equalizer, and many other areas of sound engineering that deal with sound intensity or volume. The first thing to remember about decibels is that:

Decibels are an expression of the difference between two different sound levels. Decibels are a ratio.

So, decibels are never an absolute number but the difference in sound level between two different signals. Decibels don’t have a specific value of their own.

When decibels denote a specific sound level or intensity, you must supply a reference level.

For example, if you measure the sound intensity at a Rock Concert or in your control room, you might specify “dB SPL” which is a measurement of sound pressure level where 20 micro pascals = 0 dB SPL. This reference is the average threshold of hearing, the minimal level of sound able to be detected by the human ear.  So when I measure a level of 90 dB SPL, I measure a Sound Pressure level 90 dB higher than the reference level of 20 micro pascals.

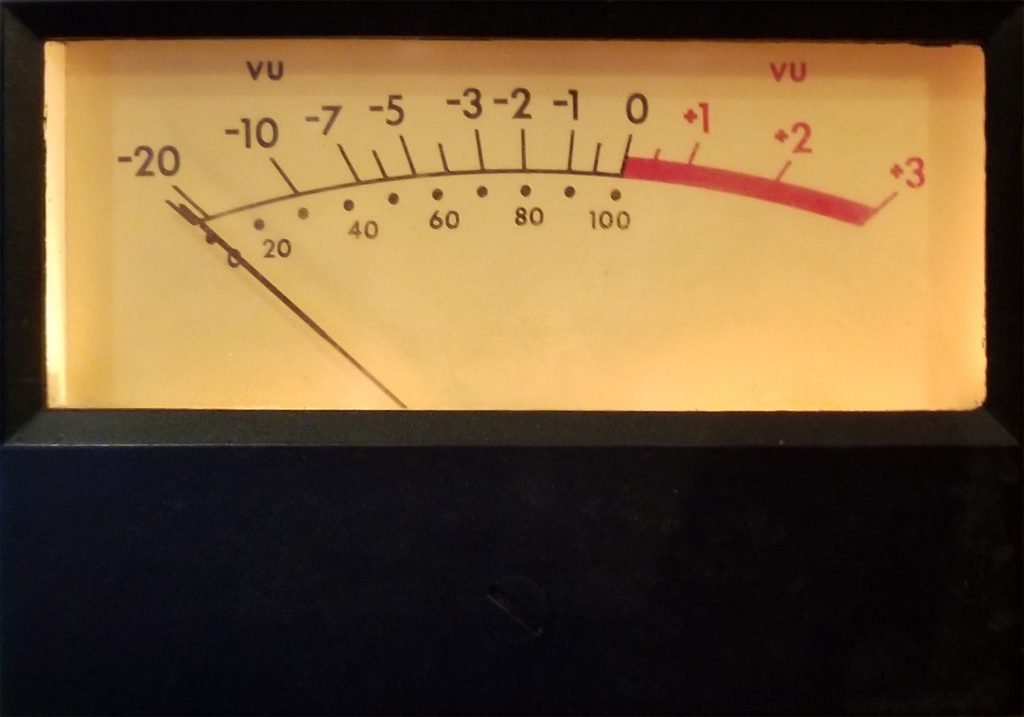
If you are looking at level meters on your console or DAW, the maximum level is usually 0 dB, and all levels are in negative dBs below that. The 0 dB reference number isn’t a specific voltage level, but it is the point at which the digital signal runs out of bits and starts to clip. You never want to exceed the “0” dB level.

There are a variety of references used in audio and equipment specifications, for example, dBA, dBV, and dBm. If you are looking at decibel values that denote specific levels, you need to understand what the reference level is.

Decibels are logarithmic.

In acoustics,  the range of intensities, pressures, and voltages are extreme, so it is convenient to use a more compressed set of numbers to express them. Decibels are thus logarithmic, and this logarithmic scale better matches the way that we hear.

The formula for determining the difference in decibels for two different powers of sound level is 

decibels = 10 log10(P1/P2)

So the difference in decibels between two powers, P1 and P2, is 10 times the logarithm of the quotient of P1 divided by P2. So if I have an amplifier putting out 10 watts of signal and increase the power to 20 watts, I have a 3 dB increase in power. If I have an amplifier putting out 100 watts of power and increase it to 200 watts, I still have a 3 dB increase in power. So, whatever the absolute values, doubling the power only produces a 3db increase in the sound.

If you are comparing voltages, rather than powers, the formula is:

decibels = 20 log10(V1/V2)

To get a feel for how much of a level change a dB is, consider this: 3dB is a noticeable change in volume when you are listening at average listening volumes. If you ask someone to turn down the volume a little, 3 dB is a readily noticeable change. The same is valid for raising the volume. Increasing the level by 3db is an easily noticeable slight increase.

If you are listening carefully at a loud volume in the studio, you can probably detect a 1 dB change in sound levels. Hearing, is of course, subjective and depends on program material and the absolute volume at which you are listening.

As part of your listening practice, you should listen to some recorded music and change the volume levels by different amounts so you can get a feel for how much 3 dB is, 6 dB is, 20 dB is, and so on.

Posted in Audio Fundamentals, Microphone Fundamentals

Phantom Power

StudioMicZone
Phantom Power (48V) Switch On Mic Preamp

The condenser microphones developed by Neumann and AKG in the 1940s and 1950s were an innovation for the quality of broadcast and recorded sound. But the capsule of the microphone required a bias voltage and an impedance transforming vacuum tube amplifier inside the microphone. The filament voltage and plate voltage requirements of the microphone, along with the bias voltage for the capsule, required a bulky power supply attached to the microphone through a heavy multi-conductor cable.

In the mid-1960s, the invention of the solid-state FET (field-effect transistor) paved the way for getting rid of the vacuum tube, and it’s associated hefty power supply. Neumann introduced its solid-state KTM microphone 1965. The microphone ran on batteries.

But shortly after, in 1966, with the KM 84, Neumann introduced Phantom Power.

Phantom powering was used for many years in the telephone service, and Neumann adapted it for its microphones. In a phantom power circuit,  the positive side of the direct current supply is applied through two same-value resistors to the two signal lines of a balanced audio connector (in modern equipment, both pins 2 and 3 of an XLR connector). The negative side of the power supply is connected to the ground pin of the connector (pin 1 of an XLR).  This is then connected to the cable shield or ground wire in the cable or both. Since the same voltage feeds each of the signal lines through matched resistors, no DC voltage is present between the signal wires. The resistors are of high enough value that they don’t affect the impedance of the audio circuit.

Neumann introduced the phantom-powered U87 in 1967.

I bought my first FET condenser microphones in 1974, a pair of Sony ECM22Ps. These microphones were capable of running off of phantom power, but I ran them off of internal batteries because very few mixers and preamps provided phantom power. By the mid-1980s, phantom power was standard on most mixers and microphone preamps.

There are three different voltage specifications for phantom power, P12, P24 and P48, 12 volts, 24 volts, and 48 volts, respectively. By far the most common voltage is 48 volts and this used on almost all new equipment. The current supplied to each microphone line should be at least 10 mA.

In the P48 voltage spec, the power is supplied to each balanced microphone line through 6.81K matched resistors. The spec recommends that the resistors be matched to within .1 %  To maintain excellent common-mode rejection on your microphone line.

USAGE OF PHANTOM POWER

  1. Phantom powering is not always implemented correctly or adequately, even in professional-quality preamps, mixers, and recorders, especially older equipment. So always check the voltage and current requirements of your microphones and the phantom power voltage and current on preamplifiers, mixers, and especially portable recorders.
  2. It is possible, but not likely that you can damage a ribbon or dynamic microphone by applying phantom power, especially if there is a wiring error or short in the cable. So why take a chance? Disable phantom power to devices that don’t require it.
  3. I’ve never seen it happen, but in rare cases, damage to a condenser microphone might occur if you plug it in with phantom power applied to the line. It is good practice to shut off phantom power when plugging and unplugging microphones.
  4. Some ribbon microphones and even a few dynamics are being built with internal preamplifiers and thus require phantom power, make sure you are aware of this.
Posted in Microphone Fundamentals, Miking Techniques and Recording

Microphone Polarity

StudioMicZone
Microphones Have Polarity

Microphones have “polarity,” and it needs to be correct. When a positive air pressure impinges on the microphone, a positive voltage should be present on pin two, relative to pin three on the XLR connector. In short, you want the speaker cone to be moving in the same direction as the microphone diaphragm

Polarity is sometimes incorrectly referred to as phase. Many microphone preamps have a polarity switch that is wrongly labeled “Phase” or might have the Ø (Phase Symbol) next to it. Changing the polarity of a microphone switches the phase 180° at all frequencies, but phase relationships between microphones are dependent on frequency and distance between the microphones.

If you have two microphones right next to each other, and if they have different polarities and you feed them into a mixer with the same gain on each channel, the outputs of the microphones cancel since they are 180° out of phase. But once you separate the microphones, the phase relationship between them becomes frequency-dependent and also dependent on the distance between the microphones.

The standard for microphone polarity is AES26-2001 (r.2006). AES26 states as a “recommended practice (their word for standard)” that pin 2 on the XLR connector shall drive the non-inverting input (or “+”) and pin 3 shall drive the inverting input or “-.” A positive pressure on the front of the microphone should produce a positive-going signal on pin 2 of the microphone.

If you are recording only one microphone, polarity isn’t important, but if you are using two or more microphones in a recording, a microphone that has reversed polarity can cause problems. On drums, it can cause a loss of low-frequencies and cause the drum with the reversed polarity microphone to sound hollow or tinny. If one microphone in a stereo pair has reversed polarity, there will be a loss of low frequencies, and the stereo perspective will be strange. Rather than sounds being positioned across the stereo field, they will sound like they are originating in your head. 

Before about 1986, there was no standard for the polarity of microphones; thus, older microphones might have reversed polarity. You should test all balanced cables in your studio for proper polarity using a cable tester or an ohmmeter. If you are using an ohmmeter, verify that pin one on one end is connected to pin one on the other connector, pin two on one end is connected to pin two on the other connector, and pin three on one end is connected to pin three on the other connector.

Once you have verified that all cables in your signal chain are wired correctly, plug the microphone that you wish to test into your DAW and set up to record. If there is a polarity switch on your preamplifier or in your DAW channel, make sure they are disengaged. Engage record and say the letter “p” into the microphone.  Expand the waveform of the recorded signal to see the beginning of it and make sure that the initial move is in the positive direction (up). If the waveform initially moves in the negative direction, either the microphone or something in the signal chain has its polarity reversed. You can reverse the polarity by reversing the wires going to pins 2 and 3 of the XLR connector of the microphone.

Posted in Microphone Fundamentals, Miking Techniques and Recording

Engineering Isn’t Easy

StudioMicZone
Image by Thorsten Frenzel from Pixabay

Learning to be a recording engineer is not easy. Like any other intricate craft, it takes time and practice. And buying more or better equipment isn’t going to make learning the process easier. In fact, it slows it down. Here are some hints to keep the process moving.

Build Your Listening Skills – Good listening skills are maybe the most important thing you need to do to become a competent recording engineer.  Not only should you be listening on good speakers, but your room also needs to enhance the accuracy. The speakers need to be set up symmetrically in the room, and the room should have enough absorption and diffusion. If you can’t build a proper listening environment, then use headphones. It’s not ideal, but it’s better than a room that is poor acoustically.

Listen to recordings that are known for good mixes and learn what a well-done mix sounds like on your system. Then listen critically to different recordings. Try to identify the type of reverbs used, what each instrument sounds like, and how they fit into the mix. In the beginning, you need to do this for a couple of hours a day, every day. Critical listening skills are essential to your progress.

Keep It Simple – Avoid buying many plug-ins and keep the outboard gear to a minimum. The plug-ins that came with your DAW are probably sufficient. You’ll need an equalizer, a compressor, and a reverb at a minimum. Choose an equalizer that has multiple frequencies that are adjustable with boost and cut labeled in decibels. Choose a compressor where you can specify the compression ratio, the threshold in decibels, and the attack and release in milliseconds. Emulations of old analog equipment with arbitrary settings and not units and channel strip emulations from classic consoles are challenging to use and won’t help you learn what you are doing. The specialized emulations can come later after you learn the basics.

Don’t worry about having multiple microphone preamps. Simple, clean preamps do the job well. Avoid vacuum tube preamps and preamps with EQ or “color.”  Again, if you wish, you can add these types of preamps once you have mastered the basics, and that means several years down the road.

Read and Watch Videos – Videos and articles by equipment and software manufacturers can help you, as well as training courses by reputable engineers. Be careful of recording forums; there can be a lot of inaccurate and misleading information on those sites. If you can take a recording course at a community college or a studio near you, this can help jump-start your education.

Practice, Practice, Practice – The most important thing is to practice. Try things and listen carefully to your results. How do your results depart from the ideal? This is the most challenging part, developing the listening skills to determine what is lacking in your recordings and then how to fix them. The answer is rarely better equipment.

Learning to be a recording engineer is a long and arduous process, just like learning a musical instrument. Persistence is your best friend.

Posted in Miking Techniques and Recording, Mixing, Monitoring and Listening

It’s About the Music (Not the Equipment)

StudioMicZone

There are no "Magic Microphones".

My friend, Bill,  had a problem with his guitar amp and since I had a tube tester, I told him to bring it over, and I would test the tubes, and hopefully be able to get it working again. We got to talking about how some people upgrade the tubes, replace the capacitors and tweak everything to get the “perfect” sound. Then he said, “All they do is mess with the equipment, but never play any music.” It’s about the music. It’s about the music.

Now, some people are into recording because they love working on equipment and the recording part is almost incidental. I get that, and it’s perfectly OK, as long as it’s not an excuse to avoid the hard work of producing something creative and of lasting value.

Equipment is only a means to an end, and what matters most is the creative process and the end result.

A high-end German microphone is not going to fix a voice that needs training and practice.

More plug-ins, better preamps and whatever other equipment you lust after is not going to make up for inexperienced engineering and failure to spend lots of time learning your craft.

More effects and more tracks cannot fix a poorly arranged song.

I have a friend, Paul, who plays upright bass in a trio with two guitar players. They all sing. They needed a demo and were going to come into the studio, but we had trouble scheduling a time. They finally decided that since they were producing a demo to get more work,  a mono demo would be adequate and they decided to record with a single mike. They spent their time balancing their mix and making it sound good in that one mike. I’m sure they’ll have a more than acceptable demo, and they probably honed their performance techniques a bit in that process. It’s about the music. The people who are booking them for a live gig really don’t care about how their demo was recorded or what mike they used.

If you are just learning guitar, you don’t need a $10,000 classic Martin. A $200 beginning guitar will work just fine. And remember, a guitar player who has been honing his craft for 30 years is going to produce some fantastic music out of that $200 beginner’s  guitar, and a 2nd-year guitar student on a $10,000 Martin is still going to sound like a beginner.

So, it’s really about balance. Find some good music and musicians to record, learn your craft well, and then worry about the fine points of the equipment. We are at a unique place in the evolution of recording technology in that professional quality recording equipment is available at such a low price point that equipment purchase is no longer a large barrier to building a small or home studio. However, just because the gear is capable of great results doesn’t make those results automatic. Like mastering any instrument, learning how to produce good recordings takes lots of practice and time. Purchasing better equipment is no short cut to the process, any more than acquiring a Steinway is going to instantly make you an accomplished pianist.

So, don’t worry too much about that classic German microphone at the beginning. Once you’ve honed your craft for a while, getting better preamps and microphones will be another incremental step in improving your product. No “magic microphone” is going to let you skip the years of learning and practicing.


Posted in Choosing & Buying Microphones, Miking Techniques and Recording, Mixing | Tagged Microphone, Pre-Amplifier

Microphone Screws and Hardware

StudioMicZone

If you want to do even a simple repair on your microphone, it is good to know that there are two different systems of screws that are used, the US system and the Metric system.

US Machine Screws are described 0-80, 2-56, 3-48, 4-40, 5-40, 6-32, 8-32, 10-32, 10-24, etc. up to 12, and by fractional inch beyond, such as 1/4-20, 3/8-16 and so on. The first number designates a diameter, the second is the number of threads per inch (TPI). Typically the description will also include the length noted as (Example 10-32X1/2.) So the screw size comes first, then an X, and then the  length in fractional inches.

Metric Screws

Smaller Metric screws are Designated with M and then the diameter in millimeters. Standard sizes are M1, M1.2, M1.6, M2, M2.5, M3, M4, M5 and so on.

Philipps Flathead, Slottted Roundhead, Slotted Panhead

Typically the description will also include the length noted as (Example M4X6). So the screw size comes first, then an X, and then the  length in millimeters.

There are several common different types of heads. A flathead screws into a countersunk hole, and when screwed in all of the way, the top of the head is even with the panel, a round head is a rounded head that sits above the panel, and a pan head is like the bottom of a pan that sits above the panel. Screws can be slotted, Phillips, TORX or other types, depending on the tool needed to tighten and remove them.

Posted in Microphone Teardown & Repair

Microphone Mounts

StudioMicZone
5/8-27 Microphone Mount

Microphone mounts in the United States have a 5/8-27 thread. In US designation, this means that the hole is of 5/8 inch diameter and the thread pitch is 27 threads-per-inch.

You may have noticed that many microphones ship with an adapter screwed into this mounting hole. This adapts the microphone for the European standard for microphone stands and mounts which is a US standard  3/8-16. That’s a 3/8 diameter hole with a pitch of 16 threads per inch.

5/8-27 to 3/8-16 Mic Adapter

If you needed to make a special mount for your microphone you could use this adapter and a standard 3/8-16 bolt which is available at any hardware store. Why the European standard mount uses a standard US sized mounting screw is a mystery to me since everything else over there is metric.

Posted in Microphone Accessories, Microphone Teardown & Repair

Post navigation

← Older posts

Visit us on:

Search

Categories

  • Audio For Video
  • Audio Fundamentals
  • Choosing & Buying Microphones
  • Classic & Antique Microphones
  • Hints and Tips
  • Microphone Accessories
  • Microphone Fundamentals
  • Microphone Modifications
  • Microphone Reviews
  • Microphone Teardown & Repair
  • Miking Techniques and Recording
  • Mixing
  • Monitoring and Listening
  • Other
  • Podcasting
  • Software
  • Studio Construction

Archives

  • March 2020
  • February 2020
  • January 2020
  • December 2019
  • November 2019
  • October 2019
  • September 2019
  • August 2019
  • July 2019
  • June 2019
  • May 2019
  • April 2019
  • March 2019
  • February 2019
  • January 2019
  • December 2018
  • October 2018
  • August 2018
  • June 2018
  • April 2018
  • February 2018
  • December 2017
  • November 2017
  • September 2017
  • January 2017
  • December 2016
  • November 2016
  • October 2016
  • August 2016
  • July 2016
  • June 2016
  • May 2016
  • February 2016
  • January 2016
  • December 2015
  • November 2015
  • October 2015
  • September 2015
  • August 2015
  • July 2015
  • June 2015
  • May 2015
Copyright © 2025 by Norwest Communications Inc. All Rights Reserved. - Weaver Xtreme Theme
↑