↓
 

StudioMicZone

Microphones and Recording Techniques for Small and Home Studios.

Studio Mic Zone - Microphone and recording techniques for small and home studios.
  • Home
  • Terms of Use
  • Privacy
  • Contact Us
  • About StudioMicZone
  • About the Blogger

Post navigation

← Older posts
Newer posts →

Caring for Your Microphones

StudioMicZone

In most studios, microphones represent a significant investment. Microphones can also be somewhat delicate instruments, so to protect your investment, proper care is important. Microphones have a very thin diaphragm or a ribbon that moves with the audio vibrations in the air and converts those vibrations into electrical signals. The lighter the diaphragm or ribbon, the better it translates the air vibrations that are sound. Anything that impedes the motion of the diaphragm or ribbon will negatively affect the sound produced by the microphone.

In most studios, microphones represent a significant investment. Microphones can also be somewhat delicate instruments, so to protect your investment, proper care is essential. Microphones have a very thin diaphragm or a ribbon that moves with the audio vibrations in the air and converts those vibrations into electrical signals. The lighter the diaphragm or ribbon, the better it translates the air vibrations that are sound. Anything that impedes the motion of the diaphragm or ribbon negatively affects the sound produced by the microphone.

For the diaphragm or ribbon to do its job correctly, it must be open to the air to sense the pressure variations caused by sound waves. This means that the diaphragm is open to moisture, dust, and other contaminants in the air. Dust and residue from moisture that builds up on a diaphragm increase its mass and makes it harder for the diaphragm to respond to higher frequencies. In ribbon microphones, particles of dust can lodge in the narrow space between the ribbon and the magnets, impeding the motion of the ribbon. Fine iron particles are attracted to the magnets and be very difficult to remove.

Note the green corrosion on the capsule edge and the missing gold deposit on the diaphragm.

Operating a microphone without a pop filter when recording voice can allow moisture to build up on the diaphragm and permanently fuse the dust and impurities in the air to the diaphragm.

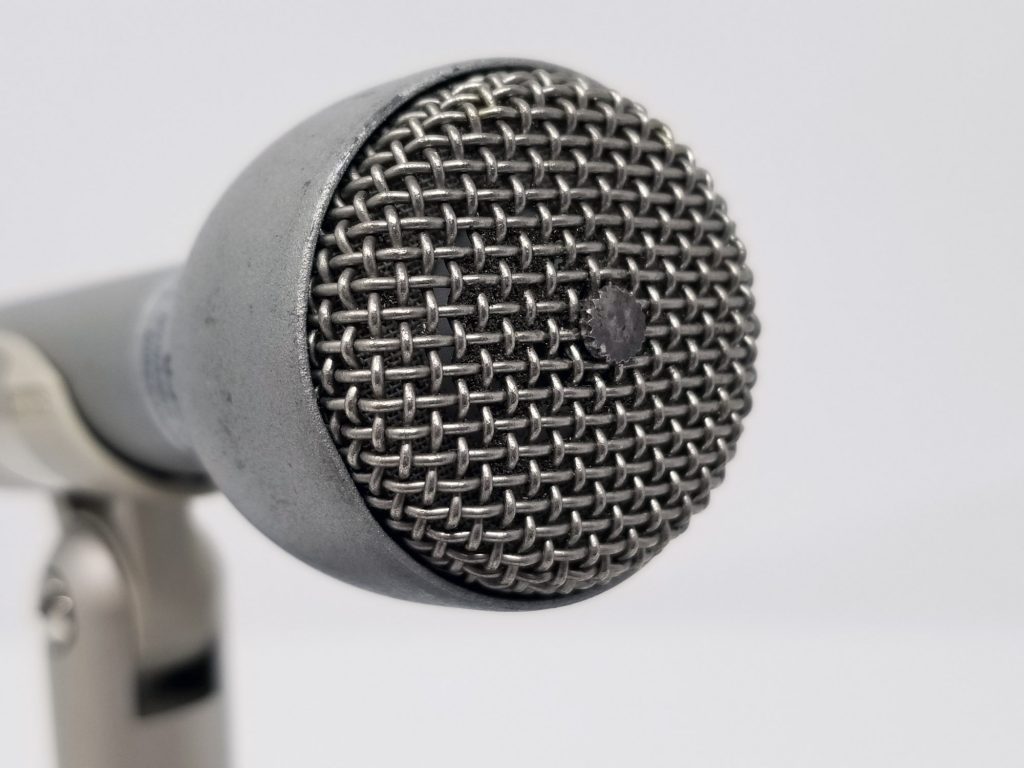
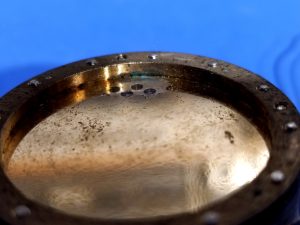
Here is a picture of a microphone capsule from a RØDE NTK microphone that has a heavy coating built up on the diaphragm, as well as corrosion of the capsule body from exposure to moisture. This microphone was likely used for voice recording and was operated without a pop filter for a long time. I tried to clean the capsule, but the corrosion had loosened the gold layer, and it took just a touch with a brush and some distilled water to remove part of the gold layer. This isn’t normal, and the capsule is beyond repair.

The late Lou Burroughs, co-founder of Electro-Voice Inc. was a well-known lecturer on the use of microphones. In his 1973 book Microphones: Design and Application he wrote about microphone maintenance:

Burroughs talks about the time he was touring a recording studio and saw several microphones lying on a dusty table waiting to be mounted on stands. He offered to the owner the opportunity of having all of the microphones serviced and cleaned so that he could research what happened to microphones in a typical studio. These were microphones with an average age of two years. When the studio closed for vacation a few weeks later, 28 microphones were sent to Burroughs, here’s what he found:

“First, curves were run; then all diaphragms and grilles were cleaned. Eight condenser microphones were received and the response of each was degraded. After cleaning, the two containing metal diaphragms returned to normal response.

The six metalized plastic diaphragm units improved considerably after cleaning, but the responses of no two were alike and none were equal to a new microphone of the same make and model.

Eleven dynamic microphones were examined and all were degraded. After the dust filters protecting the diaphragm were cleaned, eight of them returned to normal response. Three of another make had permanently warped diaphragms due to ferric dust accumulation on the diaphragm above the voice coil gap.

Of the nine ribbon microphones, all were found loaded with ferric dust and the ribbons stretched beyond repair. Here is a professional recording studio depending on a degraded microphone to reproduce quality sound.”

So what to do?

  1. ALWAYS use a pop filter when recording vocals of any type.

  2. No smoking in the studio. This isn’t the problem it was 20 or 30 years ago, but it is the quickest way to destroy a microphone.

  3. Cover microphones when not in use between sessions. When a session is done, replace the microphones in their cases. If you leave microphones set up, cover them.

  4. Always store your microphones in their cases when not in use.

  5. Most ribbon mikes should be stored with the ribbon vertical to prevent sagging.

  6. Make sure mike stands are heavy enough to support a given microphone without easily tipping over.

  7. Use desiccant packs in the microphone cases.

  8. Pack microphones properly for shipping and travel.

  9. Vacuum and dust regularly.

  10. If you need to do and remodeling or maintenance, put all microphones safely away in their cases and thoroughly clean the room before you bring them back out.

  11. Change your furnace filters regularly.

RØDE NT1000 Corrosion
Corrosion and pitting on RØDE NT1000 housing.

It is amazing the number of microphones that come across my workbench with large dents in the grill. I have repaired multiple microphones where the condenser capsule was snapped of its mounting post. This takes an immense amount of force to do and I can’t understand how it happened without trashing the outside of the microphone. And the most mystifying damage was a RØDE NT1000 that worked fine but the case was deeply pitted and appeared to have been splashed with molten metal. The only reasonable explanation was that someone was trying to record the sound of an electric welding arc and positioned the microphone a few inches from it.

Microphones represent a significant investment in most studios. Take care of them and protect your investment.

Posted in Hints and Tips, Microphone Accessories, Microphone Fundamentals, Miking Techniques and Recording, Other

Dynamic Microphones and Room Noise

StudioMicZone
Electro-Voice RE-20 Dynamic Microphone

Are dynamic microphones better at rejecting room noise than condenser mics? The short answer is “no.” There is also another misconception that condenser microphones have a better “reach” than dynamics; that is, they pick up distant sounds better. There is no such thing as “reach.” All microphones pick up sound the same way at a distance according to the Inverse Square Law, which we will discuss later.

But there are a couple of caveats. First of all, you need to be comparing microphones with the same pickup pattern. An omnidirectional microphone picks up more room noise than a cardioid. Also, a condenser microphone may have a better low-frequency response than a dynamic and pick up a little more low-frequency rumble.

First, there are a couple of terms you need to understand. The first is the signal-to-noise ratio, which is independent of microphone sensitivity. So if you are talking or singing into a microphone with the gain properly so that your meter is peaking around “0” dB, and you stop singing or talking and the meter reads -40 dB, the signal-to-noise ratio is 40 dB. In other words, the signal-to-noise ratio is how much louder the desired signal is than the background noise. In this case, the limiting factor on the signal-to-noise ratio dB room noise. In a very quiet room, the limiting factor in establishing the signal-to-noise ratio is the noise generated by the microphone and the preamplifier.

The other term is the Inverse-Square-Law, which states that the intensity of sound drops by 6 dB for each doubling of distance from the source to the microphone. Again, this is true for condenser microphones, dynamic microphones, and your ears. It’s a fundamental law of physics.

So, if you are one inch from the mike capsule and move to two inches away, the microphone output drops by 6 dB. If you move from two to four inches away, the signal level drops another 6 dB., and if you go from four to eight inches away, your signal drops another 6. But, the distance between the noise and the microphone hasn’t changed, and the noise level is constant. However, since your voice level has dropped by 18 dB, and since you moved from 1 inch to 8 inches away from the mike, you’ll need to increase the gain of the preamp by 18 dB to get your voice to be peaking around 0 dB. And by doing that, you raised the noise level by 18 dB.

So, one reason that a dynamic microphone might seem less sensitive to noise is that your lips are usually right on the microphone, maybe an inch away from the capsule since there is usually a built-in foam pop filter in the microphone. With a condenser, since you usually need to use a pop filter, you might be six to eight inches away from the capsule.

So, effectively you get a better signal-to-noise ratio because you can get closer to the dynamic. If you stay 8 inches away from both microphones, the signal-to-noise ratio should be about the same.

Posted in Choosing & Buying Microphones, Microphone Fundamentals, Miking Techniques and Recording, Podcasting

Electro-Voice Windscreen Screws

StudioMicZone
Gulmite #4 screw on Electro-Voice 635A

If you have any older Electro-Voice microphones like the RE-10 or RE-11, the RE-15 or RE-16, the 627A or a 635, you might have noticed that the windscreen is mounted to the microphone with a strange little screw that defies removal. This is a crown head or more specifically a #4 Gulmite screw.

The easy way to remove the screw is with a #4 Gulmite driver. The problem is that you cannot buy a #4 Gulmite driver anywhere. They show up on eBay once in a while, usually priced at around $50. Unless you repair many older EV mics this is likely a poor investment.

Removing Gulmite Screw with Vampliers

There is another solution, however. I discovered a tool, made by Vampire Tools, the Vampliers VT-001-5, which is a screw extraction pliers. These are designed for removing stripped screws, but they work extremely well for removing the Gulmite screws on older Electro-Voice microphones.

They also work very well for their designed use of removing stripped screws that can no longer be turned by a screwdriver. If you’ve ever repaired some of the newer imported microphones, you have likely run into this. Many of them use screws made from extremely soft metal and if you’re not careful, they will strip easily.

This has become one of my favorite tools. It’s available on Amazon where I paid about $27.00 for it and it has been worth every penny.

Posted in Microphone Teardown & Repair

How To Quickly Improve Your Audio For Video

StudioMicZone
RØDE Lavaliere Microphone

Many of the videos I see on YouTube, as well as videos released by some large companies, suffer from poor audio.  One of the biggest reasons for this is that people make their recordings using the internal microphone in their camera or smartphone. Since almost all of these videos are not recorded in a studio environment, they come out sounding noisy and reverberant because the microphone is picking up a high amount of room sound compared to the person speaking.

The solution is to get the microphone closer to the person speaking so that you hear more of them and less of the room. It’s simple. Have the person speaking wear a lavalier microphone which you plug into the camera. Of course, you’ll need to have a microphone jack on your camera or phone. Most have them. Here are some options: Audio-Technica AT829mw, RØDE smartLav+, and the Sennheiser ME 2-II. The lavalier microphone dramatically improves the sound of your audio.

A second option is to use a wireless microphone like the RØDE Wireless GO, or the Sennheiser XSW-D. Then you’ll be cable-free, although it costs you a bit more.

Finally, you can put a directional or “shotgun” microphone on your camera. This type of microphone eliminates some of the room sound but probably won’t be as effective as a lavalier. There are many types of shotgun microphones available, including the Audio-Technica ATR-6550 and the RØDE VideoMic.

Posted in Audio For Video

Do These 7 Things to Prevent Ruined Recordings

StudioMicZone

The recording process is complicated enough when things go right. Do these 7 things to prevent having your session interrupted, or worse ruined.

  1. Turn off HVAC, appliances, office phones, and cell phones that might make noise during your recording.
  2. Move equipment, instrument cases, and other items out of the way so they won’t get kicked or bumped during a session. If you balance an item precariously, it WILL fall during a recording.
  3. Save your work often. Autosave is your friend. Hard drives fail; it is just a matter of when. Back everything up to another hard drive or the cloud during breaks and at the end of the session.
  4. Test the microphones and headphones before the session. Make sure if you have any digital connections, say a mic preamp feeding the DAW through an ADAT or other digital connection, that it is connected correctly, and set the clock to the correct source. Just before you start recording, have everyone be quiet and listen with all of the mics on to make sure that there is no hum, buzz, or other noise that has crept in during the setup.
  5. When you set your levels, give yourself plenty of headroom, because musicians always get louder as they warm up. Six to nine dB headroom helps you from overloading and clipping and forcing you to redo the take.
  6. Remind everyone to be quiet at the beginning of the song and the end. Remind them to keep quiet and not move until the engineer gives them the OK. The most common problem I find during mastering is removing noises that occur as the instruments ring out at the end of a song.
  7. If you are using subscription-based software, make sure several hours ahead of the session, that your subscription is up-to-date, and won’t be trying to renew during your recording. Have your username, passwords, serial numbers, and manufacturer’s phone number ready in case there is a problem.

    Do these things, and your session will run smoother, and your life will become a little more anxiety-free.
Posted in Hints and Tips, Miking Techniques and Recording

Acoustical Insulation and Acoustical Treatment

StudioMicZone
Diffusion on the back wall of my control room.

When building a home studio, it is imperative to understand the difference between acoustical isolation and acoustical treatment.

Acoustical isolation keeps sound from coming into your space and going out of your space. It enables you to record when your neighbor is mowing the lawn and keeps your drumming from keeping your neighbor awake at night. Acoustical treatment controls the reverberation in your room. It evens out the frequency response of the room and minimizes resonances.  The means of achieving these objectives are very different.

Acoustical isolation requires heavy materials. It also requires sealing of air passages between your room and the areas outside of it. It requires special treatment of any air ducts. Often it involves building a room-within-a-room with an airspace between them. At the minimum, it involves poured concrete or concrete block construction or multiple layers of drywall. It might require double doors and, at minimum, a solid door that is airtight. Putting foam, carpeting, or absorptive materials on the walls does little if anything for isolation.

You apply acoustical treatment inside of the room to minimize and control reflections, absorb a certain amount of sound, and diffuse the rest. Some techniques are non-parallel walls, absorptive wall and ceiling treatments, and diffusers on the walls to minimize resonant reflections between walls. You might also need bass traps in the corners to even out low frequencies.

Isolation is usually more expensive than sound treatment because it involves the basic construction of the room and sometimes the expensive installation of specialized heating and cooling systems. You may need to engage an architect and contractor to construct an isolated room properly.

Acoustical treatment can be done less expensively and make most rooms usable for recording and listening with some constraints.

Studio construction is both an art and a science. Quiet studios can be costly in noisy locations. There are books on the subject, and several manufacturers make kits that you can install to improve the sound of your space.

Posted in Studio Construction

Which Microphone Will Make My Song “Radio Ready”?

StudioMicZone
Old time radio with a musical staff graphic.

I saw this post on one of the recording forums a while back, and I think it raised a good question, but not in the way the person posting it had intended. “What microphone should I buy to make my recordings “radio ready?”

The flippant answer I gave in my head was, “Maybe you should skip the microphone and get some voice lessons.” In all honesty, I knew nothing about his vocal skills, but the nature of the question was a dead giveaway that he knew little about the music production process. The person posting was not happy with his recordings and felt that what he needed was a better microphone, and if he bought the right one, all of a sudden, his recordings would get some airplay. If it were only that simple!

Producing a song that is worthy of airplay first requires a great song and a quality arrangement. The performance needs to have something in it that stands out, and then the recording needs to meet the standard of other songs that get airplay.

A well-recorded song is mostly dependent on the skill of the engineer, then the recording space, and then the equipment used. Changing any one piece of equipment in the recording chain usually does not make any significant difference in the final product. I don’t think any song ever became a hit because of the specific microphone that the singer used.

Are microphone choices important, then? Of course, they are! As engineers, we spend significant time on choosing the proper microphone for a given vocalist and maybe even different microphones for different songs. Part of our job is to get the best recording we possibly can. But I don’t think any professional audio recording engineer is under the illusion that any microphone is going to make up for a lack-luster performance or a singer who hasn’t polished their craft.

The microphones and other equipment we use are the tools that help us create our magic. Having the right tools is extremely important. But, knowing how to use them is even more critical.  Knowing the limitations of our tools is golden.

Posted in Choosing & Buying Microphones, Miking Techniques and Recording, Mixing

The StudioMicZone Microphone Collection

StudioMicZone

Here’s a little break from the usual high-tech talk. Since my microphone collection shows up in studio photos every now and then, I thought I’d describe each of the mics on the shelf and their significance. These are older microphones that I have for display purposes, some are functional and some are not. This is different from my “Mic Locker” which are the microphones I actually use for recording. I collected most of these years ago when cheap old microphones were easy to find at flea markets.

Microphone Collection (Left to Right). Electro-Voice 726 Cardyne I, Electro-Voice V2 Ribbon, Shure 556 Unidyne I, Shure 55S Unidyne II, Shure Cardiline 664, Turner 598, Lafayette PA46, Turner 99, Sony ECM-22P, Astatic JT-31, Kellogg T-48-C Carbon

Electro-VoIce 726 Cardyne I Microphone – This is a uni-directional dynamic microphone from the late 1940s. It’s similar in size to the Shure 556 “fat boy” microphone, and likely was Electro-Voice’s competitive answer to that microphone. (More Information)

Electro-VoIce V2 Ribbon Microphone – Unfortunately the nameplate is missing on this microphone so I can’t make a firm identification. I have verified that it is a ribbon by disassembling it.

Shure 556B Unidyne I microphone – This is Shure’s Unidyne I, Model 556B “Fatboy” microphone that I bought at a flea-market, probably about 20 years ago. It was one of the original Unidyne, 55 series mikes, and I bought it mostly for decorative purposes. This one works, but the response is rather thin. I have another working one that we use occasionally. (More Information)

Shure 55S – This is an old working Shure 55S Unidyne II microphone. It is smaller than the original Model 55 (and 556B) The Shure 55S, often called the “Elvis Microphone” is without a doubt the most iconic microphone ever made. Shure still manufactures them, although equipped with their latest Unidyne III cartridge.

Shure Cardiline 644 Sound Spot Shotgun Dynamic Microphone – This is a highly directional dynamic often used on a boom in early TV broadcasting. This one is non-working, but I have a gray non-reflective one as would be used on a set that works well.

Turner 598 – This was a popular PA microphone from the 1960s. This model was the first microphone that I ever repaired. I used to set up sound for assemblies in High School and we had a broken 598. I opened it up and found that the wire from the voice coil to the transformer had broken. Somehow I affected a repair on that thin wire with my trusty Wen 100 soldering gun and the mic was back in service.

Lafayette PA46 Dynamic – This model of microphone was the first one I ever owned. My parents bought it for me to go with my Lafayette tape deck in the early 1960s. The mics were a Japanese import and sold under several brand names.  The mic came with a bad capsule, but I found another with a good capsule and corroded body and replaced the capsule in this one and now it is a working microphone.

Turner 99 – The Turner 99 was their most rugged Dynamic microphone of the 1940s. I t was used wherever a microphone was needed that would stand up to abuse. There is no special significance to me other than that it is another classic microphone from the 1940s.

Sony ECM-22P – This is an electret condenser microphone from the early 1970s. This was one of the first condenser microphones I bought. I have four of them and they all still work. (More Information)

Astatic JT-31 – This is an inexpensive crystal microphone made in the 1940s by Astatic Corp. which is now CAD. This microphone has become a favorite for blues harp players and one in working order will fetch a good price. The crystal element has decayed in this one and it is for display only.

Kellogg T-48-C Carbon Microphone – This was a communications microphone, possibly military, from the early 1940s. This is likely the oldest microphone that I own. Carbon microphones were used originally for telephone communications and then for broadcasting in the early days of radio. In the late 1960s, between high school and college, I worked at a ship-to-shore radio station, WMI, in my hometown of Lorain, Ohio. All of the operator positions used microphones similar to this one as the operators provided communication to all of the ships on the Great Lakes in the days before satellite and cell phone communications.

Posted in Classic & Antique Microphones, Other

5 Things You Need to Make a Great Recording

StudioMicZone

Many components come together to produce a great recording. Here are the 5 key steps you need to know.

  1. Performance. You need to start with a good song, performed by great musicians. Legendary Memphis  studio owner, Willie Mitchell, once said, “If you’ve got a hit record, you can cut it in the bathroom on a cassette.” If you are recording spoken word and you have a narrator that can’t read or an unreadable script, there is nothing you can do to fix it.

  2. Engineering. The skill of the recording engineer is of paramount importance. You can give an experienced engineer a box of SM57 microphones and some essential recording gear, and they will make a great recording. Give an inexperienced engineer a closet full of expensive classic German Microphones and the latest equipment, and they’ll make a mess.

  3. Listening Space. If you can’t hear accurately, you won’t be able to mix. Your room needs to be symmetric so you can hear stereo properly and you need to treat it to remove resonances and unwanted reflections. If you don’t have a functional space, you’ll need to use an accurate pair of headphones. Mixing on headphones isn’t ideal, but it is better than an untreated room. In either case, you need to calibrate your ears by listening to well-mixed recordings and know how they sound in your space.

  4. Recording Space. You’ll need a space that is relatively quiet, big enough to hold the musicians you are recording, and having the sound treatment necessary to cancel any resonances and suck up the extra low frequencies. Doing close miking on all instruments can compensate for a non-perfect room.

  5. Recording Equipment. Of course, you’ll need the BASIC equipment, DAW, preamps, and microphones appropriate for the type of recording you are doing. Remember, better equipment is not going to make up for any deficiencies in the four items listed above. Once you have developed your skills as an engineer, have a good listening space and the right recording environment, then you can think about expensive microphones and extra plug-ins to add polish to your already great recordings.

Posted in Hints and Tips, Monitoring and Listening

Which Is the “Best” Microphone?

StudioMicZone

Asking about a “best” microphone is a loaded question. It leads to another question, best for what?

In short, with 155 microphone manufacturers, there are likely many microphones that will work well on a given source. Ultimately, this is a question that you will need to answer for yourself. It depends on the source, how you want the source to sound, how it will fit in the mix, the instrument, the musician, and your room. That said, there are specific microphones or types of microphones used for particular sources, so finding out what those are might be a place to start.

For example, consider recording an electric guitar. I recently did an album for what might be called an alternative rock group. Instrumentation was drums, bass, electric guitar lead, electric guitar rhythm, keyboard, female lead vocal, and background vocals. Lead vocal and guitar were the featured instruments.  We were trying to get the proper sound when miking the amp and set up four different microphones to test. We set up a favorite mic for guitar cabinets, the Shure SM-57 Dynamic. Then, as a test, A Blue Spark Condenser, an Electro-Voice ND-468 Dynamic, and a Studio Projects B1 Condenser. After listening, our uncontested choice was the Studio Projects B1 Condenser microphone; it blew away the SM-57.

So what did this tell me? It said to me that for this group, with this guitarist, with this guitar, with this amp, in my recording space, the Studio Projects B1 was the best choice. Also, the Studio Projects B1 will be on my list of microphones to try when I am recording an electric guitar.

Not long ago, I spent an afternoon in the studio with Lee Murdock, an artist I have recorded over 20 albums for. I wanted to compare a couple of small-diaphragm condenser microphones that I had recently acquired, a RØDE NT-55, and an older AKG C451EB, with my standard microphone for acoustic guitars, a Shure SM-81. Lee brought in a 6-string guitar, a 12-string guitar, and a classical guitar. We set the mics up about a foot above the 12th fret and made test recordings. All three mics performed in a way that matched their published curves. The SM-81 has a ruler-flat frequency response. The other two sounded a bit brighter, and their published curves showed a 2 dB boost in the 8 kHz. region. We agreed that all three mics made a great recording, and any of them could match the other with a little bit of EQ.

Of all uses, engineers probably spend the most time selecting a vocal microphone. Our ears are programmed to detect every nuance in the human voice, so this is a crucial choice, especially since the vocals are a vital part of most songs. If you search for which microphones were used by famous artists on their hit songs, you’ll find everything from Shure SM-58s to Classic Neumann U-47s and U-87s. When Dolly Parton was recording for RCA in Nashville, she used an Electrovoice RE-15 that they supposedly kept in a vault with her name on it. Michael Jackson reportedly used a Shure SM-7 on Thriller. Vocal mic choice is a long process and often results in not using the most expensive microphone.

In addition to how the microphone sounds, there are sometimes physical issues. Trying to position a large vacuum tube mic on a snare or tom will be next to impossible in most cases. And mics on the snare or toms might take a good whack with a drum stick, and it is better to take a  hit on a $100. SM-57, which would likely survive, than on an $1800. Neumann KM84, which probably wouldn’t. Also, many microphones wouldn’t be able to handle the sound pressure level of being within an inch of a drum head.

So in conclusion, the best microphone for an application depends on a lot of factors, and it is something that you’ll need to work out through experience.

Learn what the characteristics of each type of microphone are and their common usage. As you build your microphone locker, get different types of microphones so that you have choices that make a difference.

Read up on which microphones are usually used to record specific instruments. Experiment with other choices when you can. It is good to have your favorites for each instrument because there is rarely time during a recording session to experiment with every microphone that you will use.

Finally, remember there is no “best” microphone for any use. There is a range of microphones that will work on each source. Don’t be afraid to experiment and develop your personal favorites.

Posted in Choosing & Buying Microphones, Miking Techniques and Recording

Post navigation

← Older posts
Newer posts →

Visit us on:

Search

Categories

  • Audio For Video
  • Audio Fundamentals
  • Choosing & Buying Microphones
  • Classic & Antique Microphones
  • Hints and Tips
  • Microphone Accessories
  • Microphone Fundamentals
  • Microphone Modifications
  • Microphone Reviews
  • Microphone Teardown & Repair
  • Miking Techniques and Recording
  • Mixing
  • Monitoring and Listening
  • Other
  • Podcasting
  • Software
  • Studio Construction

Archives

  • March 2020
  • February 2020
  • January 2020
  • December 2019
  • November 2019
  • October 2019
  • September 2019
  • August 2019
  • July 2019
  • June 2019
  • May 2019
  • April 2019
  • March 2019
  • February 2019
  • January 2019
  • December 2018
  • October 2018
  • August 2018
  • June 2018
  • April 2018
  • February 2018
  • December 2017
  • November 2017
  • September 2017
  • January 2017
  • December 2016
  • November 2016
  • October 2016
  • August 2016
  • July 2016
  • June 2016
  • May 2016
  • February 2016
  • January 2016
  • December 2015
  • November 2015
  • October 2015
  • September 2015
  • August 2015
  • July 2015
  • June 2015
  • May 2015
Copyright © 2025 by Norwest Communications Inc. All Rights Reserved. - Weaver Xtreme Theme
↑