↓
 

StudioMicZone

Microphones and Recording Techniques for Small and Home Studios.

Studio Mic Zone - Microphone and recording techniques for small and home studios.
  • Home
  • Terms of Use
  • Privacy
  • Contact Us
  • About StudioMicZone
  • About the Blogger

Category Archives: Miking Techniques and Recording

Proper use of microphones. Techniques for miking specific sources.

Post navigation

← Older posts

Microphones Operate in a 3-Dimensional Space

StudioMicZone
3-Dimensional Microphone

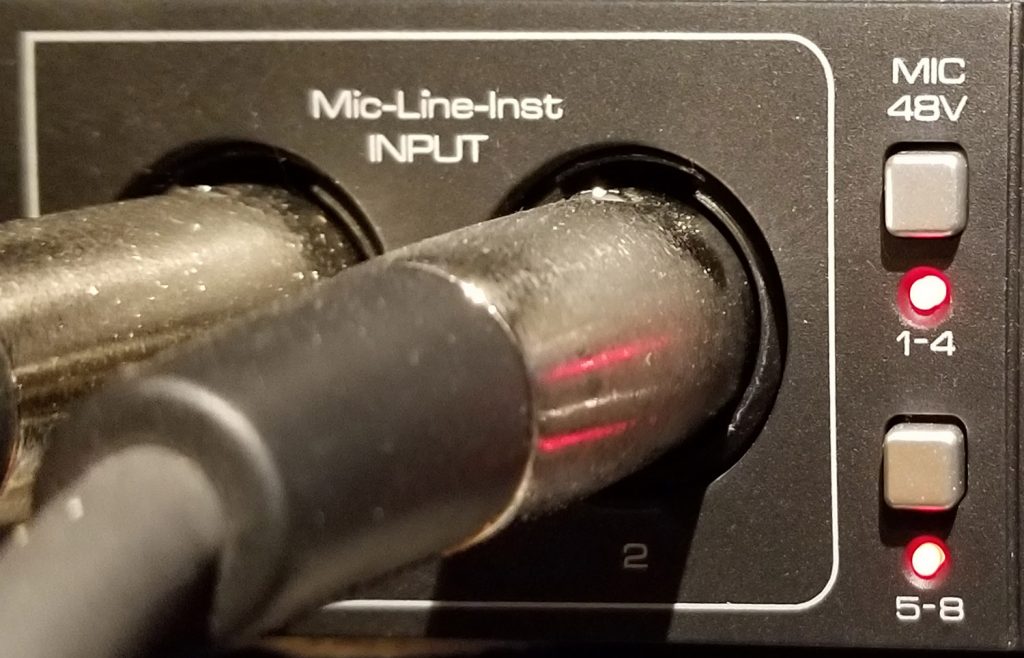
Microphones are arguably the most critical piece of equipment in the studio because they pick up the vibrations in the air that we know as sound and convert it to an electrical signal that you can record manipulate and reproduce. They are the interface between the physical world of sound and the world of recorded audio. Any discrepancies in the fidelity of the microphone become part of your recording.

 It is essential to understand that microphones operate in a 3-dimensional space. It is also important to realize that there are no point sources of sound and that the sources we record have a physical size. The sound radiates from that whole physical source, and different sounds may radiate from different parts of it.

Consider an acoustic guitar. The guitar has a physical size of about 3 feet long, a foot and a half in width, and a thickness of six or more inches. Sound radiates from the whole body of the guitar, a different sound comes out of the soundhole, the strings radiate another sound, where the fingers pluck or strum the strings is one more sound, and the fingers of the other hand sliding along the fretboard produce a separate sound.

Imagine the microphone as a mixer that combines all of these sounds. Depending on the characteristics of the microphone, its directional pattern, and how we position it in 3-D space, it picks up a different mix of all these sounds. The signal coming out of the microphone cable is one-dimensional. Thus, the output of the microphone is the sum of all of those different sounds. They are processed as a single sound by any inline processing or in the DAW.

But we’re not done yet; our imaginary mixer has additional channels! Besides the different sounds coming from the guitar, there are sound reflections off of the floor and the ceiling. There’s sound reflected from the studio walls, noises occurring in the studio, and the sounds of the guitar player breathing and moving around. And if other instruments are being played at the same time, there is leakage from those. All of these sounds mix with the music from the guitar.

You can get more room sound by moving the microphone away from the guitar or less room sound by moving it closer. You can change the sound of the guitar by pointing your microphone at different parts of the guitar. And your choice of microphones affects the balance of all of these sounds. This whole mix then comes out of the microphone cable as a single monaural signal.

This signal coming out of the microphone cable is one-dimensional, a final mix. You can’t change the balance of the mix in post-production. Any effects or processing that you do affects that whole mix of guitar and room sounds. That is why microphone choice and positioning are so critical.

Posted in Microphone Fundamentals, Miking Techniques and Recording

Phantom Power

StudioMicZone
Phantom Power (48V) Switch On Mic Preamp

The condenser microphones developed by Neumann and AKG in the 1940s and 1950s were an innovation for the quality of broadcast and recorded sound. But the capsule of the microphone required a bias voltage and an impedance transforming vacuum tube amplifier inside the microphone. The filament voltage and plate voltage requirements of the microphone, along with the bias voltage for the capsule, required a bulky power supply attached to the microphone through a heavy multi-conductor cable.

In the mid-1960s, the invention of the solid-state FET (field-effect transistor) paved the way for getting rid of the vacuum tube, and it’s associated hefty power supply. Neumann introduced its solid-state KTM microphone 1965. The microphone ran on batteries.

But shortly after, in 1966, with the KM 84, Neumann introduced Phantom Power.

Phantom powering was used for many years in the telephone service, and Neumann adapted it for its microphones. In a phantom power circuit,  the positive side of the direct current supply is applied through two same-value resistors to the two signal lines of a balanced audio connector (in modern equipment, both pins 2 and 3 of an XLR connector). The negative side of the power supply is connected to the ground pin of the connector (pin 1 of an XLR).  This is then connected to the cable shield or ground wire in the cable or both. Since the same voltage feeds each of the signal lines through matched resistors, no DC voltage is present between the signal wires. The resistors are of high enough value that they don’t affect the impedance of the audio circuit.

Neumann introduced the phantom-powered U87 in 1967.

I bought my first FET condenser microphones in 1974, a pair of Sony ECM22Ps. These microphones were capable of running off of phantom power, but I ran them off of internal batteries because very few mixers and preamps provided phantom power. By the mid-1980s, phantom power was standard on most mixers and microphone preamps.

There are three different voltage specifications for phantom power, P12, P24 and P48, 12 volts, 24 volts, and 48 volts, respectively. By far the most common voltage is 48 volts and this used on almost all new equipment. The current supplied to each microphone line should be at least 10 mA.

In the P48 voltage spec, the power is supplied to each balanced microphone line through 6.81K matched resistors. The spec recommends that the resistors be matched to within .1 %  To maintain excellent common-mode rejection on your microphone line.

USAGE OF PHANTOM POWER

  1. Phantom powering is not always implemented correctly or adequately, even in professional-quality preamps, mixers, and recorders, especially older equipment. So always check the voltage and current requirements of your microphones and the phantom power voltage and current on preamplifiers, mixers, and especially portable recorders.
  2. It is possible, but not likely that you can damage a ribbon or dynamic microphone by applying phantom power, especially if there is a wiring error or short in the cable. So why take a chance? Disable phantom power to devices that don’t require it.
  3. I’ve never seen it happen, but in rare cases, damage to a condenser microphone might occur if you plug it in with phantom power applied to the line. It is good practice to shut off phantom power when plugging and unplugging microphones.
  4. Some ribbon microphones and even a few dynamics are being built with internal preamplifiers and thus require phantom power, make sure you are aware of this.
Posted in Microphone Fundamentals, Miking Techniques and Recording

Microphone Polarity

StudioMicZone
Microphones Have Polarity

Microphones have “polarity,” and it needs to be correct. When a positive air pressure impinges on the microphone, a positive voltage should be present on pin two, relative to pin three on the XLR connector. In short, you want the speaker cone to be moving in the same direction as the microphone diaphragm

Polarity is sometimes incorrectly referred to as phase. Many microphone preamps have a polarity switch that is wrongly labeled “Phase” or might have the Ø (Phase Symbol) next to it. Changing the polarity of a microphone switches the phase 180° at all frequencies, but phase relationships between microphones are dependent on frequency and distance between the microphones.

If you have two microphones right next to each other, and if they have different polarities and you feed them into a mixer with the same gain on each channel, the outputs of the microphones cancel since they are 180° out of phase. But once you separate the microphones, the phase relationship between them becomes frequency-dependent and also dependent on the distance between the microphones.

The standard for microphone polarity is AES26-2001 (r.2006). AES26 states as a “recommended practice (their word for standard)” that pin 2 on the XLR connector shall drive the non-inverting input (or “+”) and pin 3 shall drive the inverting input or “-.” A positive pressure on the front of the microphone should produce a positive-going signal on pin 2 of the microphone.

If you are recording only one microphone, polarity isn’t important, but if you are using two or more microphones in a recording, a microphone that has reversed polarity can cause problems. On drums, it can cause a loss of low-frequencies and cause the drum with the reversed polarity microphone to sound hollow or tinny. If one microphone in a stereo pair has reversed polarity, there will be a loss of low frequencies, and the stereo perspective will be strange. Rather than sounds being positioned across the stereo field, they will sound like they are originating in your head. 

Before about 1986, there was no standard for the polarity of microphones; thus, older microphones might have reversed polarity. You should test all balanced cables in your studio for proper polarity using a cable tester or an ohmmeter. If you are using an ohmmeter, verify that pin one on one end is connected to pin one on the other connector, pin two on one end is connected to pin two on the other connector, and pin three on one end is connected to pin three on the other connector.

Once you have verified that all cables in your signal chain are wired correctly, plug the microphone that you wish to test into your DAW and set up to record. If there is a polarity switch on your preamplifier or in your DAW channel, make sure they are disengaged. Engage record and say the letter “p” into the microphone.  Expand the waveform of the recorded signal to see the beginning of it and make sure that the initial move is in the positive direction (up). If the waveform initially moves in the negative direction, either the microphone or something in the signal chain has its polarity reversed. You can reverse the polarity by reversing the wires going to pins 2 and 3 of the XLR connector of the microphone.

Posted in Microphone Fundamentals, Miking Techniques and Recording

Engineering Isn’t Easy

StudioMicZone
Image by Thorsten Frenzel from Pixabay

Learning to be a recording engineer is not easy. Like any other intricate craft, it takes time and practice. And buying more or better equipment isn’t going to make learning the process easier. In fact, it slows it down. Here are some hints to keep the process moving.

Build Your Listening Skills – Good listening skills are maybe the most important thing you need to do to become a competent recording engineer.  Not only should you be listening on good speakers, but your room also needs to enhance the accuracy. The speakers need to be set up symmetrically in the room, and the room should have enough absorption and diffusion. If you can’t build a proper listening environment, then use headphones. It’s not ideal, but it’s better than a room that is poor acoustically.

Listen to recordings that are known for good mixes and learn what a well-done mix sounds like on your system. Then listen critically to different recordings. Try to identify the type of reverbs used, what each instrument sounds like, and how they fit into the mix. In the beginning, you need to do this for a couple of hours a day, every day. Critical listening skills are essential to your progress.

Keep It Simple – Avoid buying many plug-ins and keep the outboard gear to a minimum. The plug-ins that came with your DAW are probably sufficient. You’ll need an equalizer, a compressor, and a reverb at a minimum. Choose an equalizer that has multiple frequencies that are adjustable with boost and cut labeled in decibels. Choose a compressor where you can specify the compression ratio, the threshold in decibels, and the attack and release in milliseconds. Emulations of old analog equipment with arbitrary settings and not units and channel strip emulations from classic consoles are challenging to use and won’t help you learn what you are doing. The specialized emulations can come later after you learn the basics.

Don’t worry about having multiple microphone preamps. Simple, clean preamps do the job well. Avoid vacuum tube preamps and preamps with EQ or “color.”  Again, if you wish, you can add these types of preamps once you have mastered the basics, and that means several years down the road.

Read and Watch Videos – Videos and articles by equipment and software manufacturers can help you, as well as training courses by reputable engineers. Be careful of recording forums; there can be a lot of inaccurate and misleading information on those sites. If you can take a recording course at a community college or a studio near you, this can help jump-start your education.

Practice, Practice, Practice – The most important thing is to practice. Try things and listen carefully to your results. How do your results depart from the ideal? This is the most challenging part, developing the listening skills to determine what is lacking in your recordings and then how to fix them. The answer is rarely better equipment.

Learning to be a recording engineer is a long and arduous process, just like learning a musical instrument. Persistence is your best friend.

Posted in Miking Techniques and Recording, Mixing, Monitoring and Listening

It’s About the Music (Not the Equipment)

StudioMicZone

There are no "Magic Microphones".

My friend, Bill,  had a problem with his guitar amp and since I had a tube tester, I told him to bring it over, and I would test the tubes, and hopefully be able to get it working again. We got to talking about how some people upgrade the tubes, replace the capacitors and tweak everything to get the “perfect” sound. Then he said, “All they do is mess with the equipment, but never play any music.” It’s about the music. It’s about the music.

Now, some people are into recording because they love working on equipment and the recording part is almost incidental. I get that, and it’s perfectly OK, as long as it’s not an excuse to avoid the hard work of producing something creative and of lasting value.

Equipment is only a means to an end, and what matters most is the creative process and the end result.

A high-end German microphone is not going to fix a voice that needs training and practice.

More plug-ins, better preamps and whatever other equipment you lust after is not going to make up for inexperienced engineering and failure to spend lots of time learning your craft.

More effects and more tracks cannot fix a poorly arranged song.

I have a friend, Paul, who plays upright bass in a trio with two guitar players. They all sing. They needed a demo and were going to come into the studio, but we had trouble scheduling a time. They finally decided that since they were producing a demo to get more work,  a mono demo would be adequate and they decided to record with a single mike. They spent their time balancing their mix and making it sound good in that one mike. I’m sure they’ll have a more than acceptable demo, and they probably honed their performance techniques a bit in that process. It’s about the music. The people who are booking them for a live gig really don’t care about how their demo was recorded or what mike they used.

If you are just learning guitar, you don’t need a $10,000 classic Martin. A $200 beginning guitar will work just fine. And remember, a guitar player who has been honing his craft for 30 years is going to produce some fantastic music out of that $200 beginner’s  guitar, and a 2nd-year guitar student on a $10,000 Martin is still going to sound like a beginner.

So, it’s really about balance. Find some good music and musicians to record, learn your craft well, and then worry about the fine points of the equipment. We are at a unique place in the evolution of recording technology in that professional quality recording equipment is available at such a low price point that equipment purchase is no longer a large barrier to building a small or home studio. However, just because the gear is capable of great results doesn’t make those results automatic. Like mastering any instrument, learning how to produce good recordings takes lots of practice and time. Purchasing better equipment is no short cut to the process, any more than acquiring a Steinway is going to instantly make you an accomplished pianist.

So, don’t worry too much about that classic German microphone at the beginning. Once you’ve honed your craft for a while, getting better preamps and microphones will be another incremental step in improving your product. No “magic microphone” is going to let you skip the years of learning and practicing.


Posted in Choosing & Buying Microphones, Miking Techniques and Recording, Mixing | Tagged Microphone, Pre-Amplifier

Caring for Your Microphones

StudioMicZone

In most studios, microphones represent a significant investment. Microphones can also be somewhat delicate instruments, so to protect your investment, proper care is important. Microphones have a very thin diaphragm or a ribbon that moves with the audio vibrations in the air and converts those vibrations into electrical signals. The lighter the diaphragm or ribbon, the better it translates the air vibrations that are sound. Anything that impedes the motion of the diaphragm or ribbon will negatively affect the sound produced by the microphone.

In most studios, microphones represent a significant investment. Microphones can also be somewhat delicate instruments, so to protect your investment, proper care is essential. Microphones have a very thin diaphragm or a ribbon that moves with the audio vibrations in the air and converts those vibrations into electrical signals. The lighter the diaphragm or ribbon, the better it translates the air vibrations that are sound. Anything that impedes the motion of the diaphragm or ribbon negatively affects the sound produced by the microphone.

For the diaphragm or ribbon to do its job correctly, it must be open to the air to sense the pressure variations caused by sound waves. This means that the diaphragm is open to moisture, dust, and other contaminants in the air. Dust and residue from moisture that builds up on a diaphragm increase its mass and makes it harder for the diaphragm to respond to higher frequencies. In ribbon microphones, particles of dust can lodge in the narrow space between the ribbon and the magnets, impeding the motion of the ribbon. Fine iron particles are attracted to the magnets and be very difficult to remove.

Note the green corrosion on the capsule edge and the missing gold deposit on the diaphragm.

Operating a microphone without a pop filter when recording voice can allow moisture to build up on the diaphragm and permanently fuse the dust and impurities in the air to the diaphragm.

Here is a picture of a microphone capsule from a RØDE NTK microphone that has a heavy coating built up on the diaphragm, as well as corrosion of the capsule body from exposure to moisture. This microphone was likely used for voice recording and was operated without a pop filter for a long time. I tried to clean the capsule, but the corrosion had loosened the gold layer, and it took just a touch with a brush and some distilled water to remove part of the gold layer. This isn’t normal, and the capsule is beyond repair.

The late Lou Burroughs, co-founder of Electro-Voice Inc. was a well-known lecturer on the use of microphones. In his 1973 book Microphones: Design and Application he wrote about microphone maintenance:

Burroughs talks about the time he was touring a recording studio and saw several microphones lying on a dusty table waiting to be mounted on stands. He offered to the owner the opportunity of having all of the microphones serviced and cleaned so that he could research what happened to microphones in a typical studio. These were microphones with an average age of two years. When the studio closed for vacation a few weeks later, 28 microphones were sent to Burroughs, here’s what he found:

“First, curves were run; then all diaphragms and grilles were cleaned. Eight condenser microphones were received and the response of each was degraded. After cleaning, the two containing metal diaphragms returned to normal response.

The six metalized plastic diaphragm units improved considerably after cleaning, but the responses of no two were alike and none were equal to a new microphone of the same make and model.

Eleven dynamic microphones were examined and all were degraded. After the dust filters protecting the diaphragm were cleaned, eight of them returned to normal response. Three of another make had permanently warped diaphragms due to ferric dust accumulation on the diaphragm above the voice coil gap.

Of the nine ribbon microphones, all were found loaded with ferric dust and the ribbons stretched beyond repair. Here is a professional recording studio depending on a degraded microphone to reproduce quality sound.”

So what to do?

  1. ALWAYS use a pop filter when recording vocals of any type.

  2. No smoking in the studio. This isn’t the problem it was 20 or 30 years ago, but it is the quickest way to destroy a microphone.

  3. Cover microphones when not in use between sessions. When a session is done, replace the microphones in their cases. If you leave microphones set up, cover them.

  4. Always store your microphones in their cases when not in use.

  5. Most ribbon mikes should be stored with the ribbon vertical to prevent sagging.

  6. Make sure mike stands are heavy enough to support a given microphone without easily tipping over.

  7. Use desiccant packs in the microphone cases.

  8. Pack microphones properly for shipping and travel.

  9. Vacuum and dust regularly.

  10. If you need to do and remodeling or maintenance, put all microphones safely away in their cases and thoroughly clean the room before you bring them back out.

  11. Change your furnace filters regularly.

RØDE NT1000 Corrosion
Corrosion and pitting on RØDE NT1000 housing.

It is amazing the number of microphones that come across my workbench with large dents in the grill. I have repaired multiple microphones where the condenser capsule was snapped of its mounting post. This takes an immense amount of force to do and I can’t understand how it happened without trashing the outside of the microphone. And the most mystifying damage was a RØDE NT1000 that worked fine but the case was deeply pitted and appeared to have been splashed with molten metal. The only reasonable explanation was that someone was trying to record the sound of an electric welding arc and positioned the microphone a few inches from it.

Microphones represent a significant investment in most studios. Take care of them and protect your investment.

Posted in Hints and Tips, Microphone Accessories, Microphone Fundamentals, Miking Techniques and Recording, Other

Dynamic Microphones and Room Noise

StudioMicZone
Electro-Voice RE-20 Dynamic Microphone

Are dynamic microphones better at rejecting room noise than condenser mics? The short answer is “no.” There is also another misconception that condenser microphones have a better “reach” than dynamics; that is, they pick up distant sounds better. There is no such thing as “reach.” All microphones pick up sound the same way at a distance according to the Inverse Square Law, which we will discuss later.

But there are a couple of caveats. First of all, you need to be comparing microphones with the same pickup pattern. An omnidirectional microphone picks up more room noise than a cardioid. Also, a condenser microphone may have a better low-frequency response than a dynamic and pick up a little more low-frequency rumble.

First, there are a couple of terms you need to understand. The first is the signal-to-noise ratio, which is independent of microphone sensitivity. So if you are talking or singing into a microphone with the gain properly so that your meter is peaking around “0” dB, and you stop singing or talking and the meter reads -40 dB, the signal-to-noise ratio is 40 dB. In other words, the signal-to-noise ratio is how much louder the desired signal is than the background noise. In this case, the limiting factor on the signal-to-noise ratio dB room noise. In a very quiet room, the limiting factor in establishing the signal-to-noise ratio is the noise generated by the microphone and the preamplifier.

The other term is the Inverse-Square-Law, which states that the intensity of sound drops by 6 dB for each doubling of distance from the source to the microphone. Again, this is true for condenser microphones, dynamic microphones, and your ears. It’s a fundamental law of physics.

So, if you are one inch from the mike capsule and move to two inches away, the microphone output drops by 6 dB. If you move from two to four inches away, the signal level drops another 6 dB., and if you go from four to eight inches away, your signal drops another 6. But, the distance between the noise and the microphone hasn’t changed, and the noise level is constant. However, since your voice level has dropped by 18 dB, and since you moved from 1 inch to 8 inches away from the mike, you’ll need to increase the gain of the preamp by 18 dB to get your voice to be peaking around 0 dB. And by doing that, you raised the noise level by 18 dB.

So, one reason that a dynamic microphone might seem less sensitive to noise is that your lips are usually right on the microphone, maybe an inch away from the capsule since there is usually a built-in foam pop filter in the microphone. With a condenser, since you usually need to use a pop filter, you might be six to eight inches away from the capsule.

So, effectively you get a better signal-to-noise ratio because you can get closer to the dynamic. If you stay 8 inches away from both microphones, the signal-to-noise ratio should be about the same.

Posted in Choosing & Buying Microphones, Microphone Fundamentals, Miking Techniques and Recording, Podcasting

Do These 7 Things to Prevent Ruined Recordings

StudioMicZone

The recording process is complicated enough when things go right. Do these 7 things to prevent having your session interrupted, or worse ruined.

  1. Turn off HVAC, appliances, office phones, and cell phones that might make noise during your recording.
  2. Move equipment, instrument cases, and other items out of the way so they won’t get kicked or bumped during a session. If you balance an item precariously, it WILL fall during a recording.
  3. Save your work often. Autosave is your friend. Hard drives fail; it is just a matter of when. Back everything up to another hard drive or the cloud during breaks and at the end of the session.
  4. Test the microphones and headphones before the session. Make sure if you have any digital connections, say a mic preamp feeding the DAW through an ADAT or other digital connection, that it is connected correctly, and set the clock to the correct source. Just before you start recording, have everyone be quiet and listen with all of the mics on to make sure that there is no hum, buzz, or other noise that has crept in during the setup.
  5. When you set your levels, give yourself plenty of headroom, because musicians always get louder as they warm up. Six to nine dB headroom helps you from overloading and clipping and forcing you to redo the take.
  6. Remind everyone to be quiet at the beginning of the song and the end. Remind them to keep quiet and not move until the engineer gives them the OK. The most common problem I find during mastering is removing noises that occur as the instruments ring out at the end of a song.
  7. If you are using subscription-based software, make sure several hours ahead of the session, that your subscription is up-to-date, and won’t be trying to renew during your recording. Have your username, passwords, serial numbers, and manufacturer’s phone number ready in case there is a problem.

    Do these things, and your session will run smoother, and your life will become a little more anxiety-free.
Posted in Hints and Tips, Miking Techniques and Recording

Which Microphone Will Make My Song “Radio Ready”?

StudioMicZone
Old time radio with a musical staff graphic.

I saw this post on one of the recording forums a while back, and I think it raised a good question, but not in the way the person posting it had intended. “What microphone should I buy to make my recordings “radio ready?”

The flippant answer I gave in my head was, “Maybe you should skip the microphone and get some voice lessons.” In all honesty, I knew nothing about his vocal skills, but the nature of the question was a dead giveaway that he knew little about the music production process. The person posting was not happy with his recordings and felt that what he needed was a better microphone, and if he bought the right one, all of a sudden, his recordings would get some airplay. If it were only that simple!

Producing a song that is worthy of airplay first requires a great song and a quality arrangement. The performance needs to have something in it that stands out, and then the recording needs to meet the standard of other songs that get airplay.

A well-recorded song is mostly dependent on the skill of the engineer, then the recording space, and then the equipment used. Changing any one piece of equipment in the recording chain usually does not make any significant difference in the final product. I don’t think any song ever became a hit because of the specific microphone that the singer used.

Are microphone choices important, then? Of course, they are! As engineers, we spend significant time on choosing the proper microphone for a given vocalist and maybe even different microphones for different songs. Part of our job is to get the best recording we possibly can. But I don’t think any professional audio recording engineer is under the illusion that any microphone is going to make up for a lack-luster performance or a singer who hasn’t polished their craft.

The microphones and other equipment we use are the tools that help us create our magic. Having the right tools is extremely important. But, knowing how to use them is even more critical.  Knowing the limitations of our tools is golden.

Posted in Choosing & Buying Microphones, Miking Techniques and Recording, Mixing

Which Is the “Best” Microphone?

StudioMicZone

Asking about a “best” microphone is a loaded question. It leads to another question, best for what?

In short, with 155 microphone manufacturers, there are likely many microphones that will work well on a given source. Ultimately, this is a question that you will need to answer for yourself. It depends on the source, how you want the source to sound, how it will fit in the mix, the instrument, the musician, and your room. That said, there are specific microphones or types of microphones used for particular sources, so finding out what those are might be a place to start.

For example, consider recording an electric guitar. I recently did an album for what might be called an alternative rock group. Instrumentation was drums, bass, electric guitar lead, electric guitar rhythm, keyboard, female lead vocal, and background vocals. Lead vocal and guitar were the featured instruments.  We were trying to get the proper sound when miking the amp and set up four different microphones to test. We set up a favorite mic for guitar cabinets, the Shure SM-57 Dynamic. Then, as a test, A Blue Spark Condenser, an Electro-Voice ND-468 Dynamic, and a Studio Projects B1 Condenser. After listening, our uncontested choice was the Studio Projects B1 Condenser microphone; it blew away the SM-57.

So what did this tell me? It said to me that for this group, with this guitarist, with this guitar, with this amp, in my recording space, the Studio Projects B1 was the best choice. Also, the Studio Projects B1 will be on my list of microphones to try when I am recording an electric guitar.

Not long ago, I spent an afternoon in the studio with Lee Murdock, an artist I have recorded over 20 albums for. I wanted to compare a couple of small-diaphragm condenser microphones that I had recently acquired, a RØDE NT-55, and an older AKG C451EB, with my standard microphone for acoustic guitars, a Shure SM-81. Lee brought in a 6-string guitar, a 12-string guitar, and a classical guitar. We set the mics up about a foot above the 12th fret and made test recordings. All three mics performed in a way that matched their published curves. The SM-81 has a ruler-flat frequency response. The other two sounded a bit brighter, and their published curves showed a 2 dB boost in the 8 kHz. region. We agreed that all three mics made a great recording, and any of them could match the other with a little bit of EQ.

Of all uses, engineers probably spend the most time selecting a vocal microphone. Our ears are programmed to detect every nuance in the human voice, so this is a crucial choice, especially since the vocals are a vital part of most songs. If you search for which microphones were used by famous artists on their hit songs, you’ll find everything from Shure SM-58s to Classic Neumann U-47s and U-87s. When Dolly Parton was recording for RCA in Nashville, she used an Electrovoice RE-15 that they supposedly kept in a vault with her name on it. Michael Jackson reportedly used a Shure SM-7 on Thriller. Vocal mic choice is a long process and often results in not using the most expensive microphone.

In addition to how the microphone sounds, there are sometimes physical issues. Trying to position a large vacuum tube mic on a snare or tom will be next to impossible in most cases. And mics on the snare or toms might take a good whack with a drum stick, and it is better to take a  hit on a $100. SM-57, which would likely survive, than on an $1800. Neumann KM84, which probably wouldn’t. Also, many microphones wouldn’t be able to handle the sound pressure level of being within an inch of a drum head.

So in conclusion, the best microphone for an application depends on a lot of factors, and it is something that you’ll need to work out through experience.

Learn what the characteristics of each type of microphone are and their common usage. As you build your microphone locker, get different types of microphones so that you have choices that make a difference.

Read up on which microphones are usually used to record specific instruments. Experiment with other choices when you can. It is good to have your favorites for each instrument because there is rarely time during a recording session to experiment with every microphone that you will use.

Finally, remember there is no “best” microphone for any use. There is a range of microphones that will work on each source. Don’t be afraid to experiment and develop your personal favorites.

Posted in Choosing & Buying Microphones, Miking Techniques and Recording

Post navigation

← Older posts

Visit us on:

Search

Categories

  • Audio For Video
  • Audio Fundamentals
  • Choosing & Buying Microphones
  • Classic & Antique Microphones
  • Hints and Tips
  • Microphone Accessories
  • Microphone Fundamentals
  • Microphone Modifications
  • Microphone Reviews
  • Microphone Teardown & Repair
  • Miking Techniques and Recording
  • Mixing
  • Monitoring and Listening
  • Other
  • Podcasting
  • Software
  • Studio Construction

Archives

  • March 2020
  • February 2020
  • January 2020
  • December 2019
  • November 2019
  • October 2019
  • September 2019
  • August 2019
  • July 2019
  • June 2019
  • May 2019
  • April 2019
  • March 2019
  • February 2019
  • January 2019
  • December 2018
  • October 2018
  • August 2018
  • June 2018
  • April 2018
  • February 2018
  • December 2017
  • November 2017
  • September 2017
  • January 2017
  • December 2016
  • November 2016
  • October 2016
  • August 2016
  • July 2016
  • June 2016
  • May 2016
  • February 2016
  • January 2016
  • December 2015
  • November 2015
  • October 2015
  • September 2015
  • August 2015
  • July 2015
  • June 2015
  • May 2015
Copyright © 2025 by Norwest Communications Inc. All Rights Reserved. - Weaver Xtreme Theme
↑