After a bit more listening, I still felt that the low-end evenness in the room left something to be desired. After thinking about it, I decided that the best way to compensate for the low ceiling was to make it as absorptive as possible. So I filled the space between my ten inch deep joists with fiberglass batts. Now the room was starting to sound decent, although the stereo imaging was still not acceptable. But there was still no diffusion on the side or back walls, so that would be expected.
I really wanted to do a full test including live recording, so Lee Murdock came in and did a brief recording test, and loved the results. Danielle and Bill from Even the Jackals agreed to be guinea pigs for testing the studio. They have a new group that plays acoustic music and go by The Crickets. My initial recording results with them were encouraging.
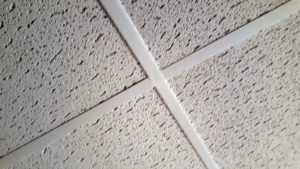
Ceiling tile and grid.
I still wasn’t sure what to do for final ceiling treatment. A dropped ceiling with absorptive tiles would likely be the best acoustical choice, but I couldn’t afford to lose five or six more inches of room height since the ceiling was already so low. I finally found a tile mounting system that has a grid like a dropped ceiling but could be mounted right on the joists with no space. So I bought the grid and ceiling tiles with the best noise rating that I could find, (NRC = .8) and began the installation.
Installation of the panels was a real pain and generated lots of cursing since the plastic rails bent and warped. If I had it to do over again, I would have installed wood furring strips first and then put the rails on those which would have made things a lot easier, but again, hindsight is always 20/20. It took a couple of days, but it looked good at the end, and the sound of the room went up a notch as well as the look.
I also needed to add some absorption to the front of the right side wall next to the right speaker. I probably could have built something, but with many things yet to be completed, I decided to purchase a couple of 2-foot by 4-foot panel diffusers from a company called ATS Acoustics.
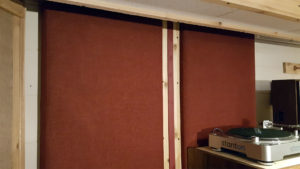
ATS Acoustics sound absorbing panels installed on the right side wall.
This company has its act together. About 2:00 in the afternoon I placed an order online for two panels with a custom color. I paid a few bucks extra for expedited delivery and expedited it was. The panels were on my front doorstep by noon the next day! That’s less than 24-hour delivery! And for a custom color. The panels came with a full-size paper template with printed instructions on the template for mounting the z-clips on the panel and the wall. I used the template to drill the wall and the panel, attached the z-clips, and the panels hung perfectly on the first attempt. Wow, one more item to scratch off the list.
These panels are opposite the control room door, which should also be absorptive, but can’t be because it is mostly glass. If the door is closed, the stereo image moves slightly to the left because of the reflective door, but an open door is like total absorption, so I leave the door open for mixing, and my imaging is fine. A slightly skewed stereo image is not a factor when tracking with the door closed.
Now, I needed to finish a lot of cosmetic and practical items. I installed trim strips on the front wall to cover the staples and seams in the burlap. Lee came in and installed the oak rail on top of the half wall, and we installed trim strips to cover the staples and seams on that wall.
I built a cover to hide cables going from the ceiling to the rack on the right side wall. I also made cable hangers on the left side wall and installed a cabinet that we moved from the other studio below it to hold microphones. These items will provide diffusion on that wall.
There were a variety of other trim items done at his point including staining and varnishing the control room door. The next major item will be to decide on and install some diffusion on the back wall to break up reflections and improve the stereo imaging in the room.