↓
 

StudioMicZone

Microphones and Recording Techniques for Small and Home Studios.

Studio Mic Zone - Microphone and recording techniques for small and home studios.
  • Home
  • Terms of Use
  • Privacy
  • Contact Us
  • About StudioMicZone
  • About the Blogger

Category Archives: Microphone Fundamentals

How microphones work. How they are classified and the different types. Microphone characteristics and specifications.

Microphones – “Good” and “Bad”

StudioMicZone

As you will see in the next few posts, there are many ways to classify microphones. You can categorize them by type: dynamic, ribbon, and condenser. You can also group them by directionality: omni, cardioid, and figure 8. Some people would also group them as “good” and “bad.” Of course, we all want good microphones and would like to avoid the bad ones, but the answer to the question is extremely subjective.

Usually, the question implies, “What is the cost of” a good microphone. The answer to that is $100.  The Shure SM57 is probably the most popular microphone used in recording studios. It appears in almost every studio’s mic locker, and usually in multiples. The SM-57 retails for around $100. The answer is also $3500. This is the cost of a Neumann U87, which appears in all major studios and has been used on countless hit songs. So, it isn’t about price.

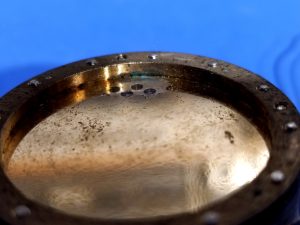
Astatic Corporation in Conneaut, Ohio, built a little green bullet-shaped crystal microphone in the 1940s called the JT-31. Crystal microphones are rarely used today because of their poor frequency response and distortion. The JT-31 was used as a Public-Address and communications microphone. It sounded terrible by today’s standards but became extremely popular among blues harp players. It was lightweight, cupped in the hands easily, and distorted the sound (in a pleasing way) when played through a tube amplifier. So if you are a harmonica player, it is a good microphone. So, “good” depends on your use.

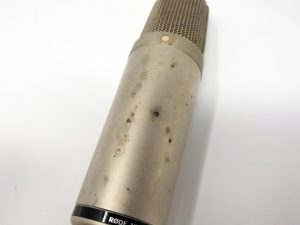
The Neumann U87AI is a $3500. microphone. It has a self-noise level of 12 dB(A). The $250. RØDE NT1, which sells for about $250. has a self-noise of only 4.5 dB(A), which is 7.5 dB better than the Neumann. This is a significant amount. If you need a quiet microphone, buy the RØDE. “Good” depends on what specification is essential to you.

I could go on here, but I hope you can see that what is “good” is very subjective.  Much depends on what your needs are. In general, microphones of any type, condenser, dynamic, and ribbon, at the very bottom of the price range, have compromised build quality and poor quality control.  But that changes quickly as the microphones go up in price. Because of modern manufacturing methods and the precision of computer-controlled machines, the cost of manufacturing a great microphone has diminished considerably. Plus, the economies of scale kick in as the home recording market has exploded in the past 25 years, and the volume of quality recording microphones has increased exponentially as well. As an electrical engineer, I don’t see anything in the build or components of most microphones that justifies a price of over $1500.

The differences in quality between a $500. microphone and a $3500. microphone are subtle. But there is intangible value in knowing you are buying the best. There is considerable psychological value in using the model of microphone that studios have used for years to record many classic hits.  And what is that intangible value? Significant since many people are willing to acquire microphones for over $1500.

Consider this, a $40. crystal-controlled Timex watch is four times as accurate as a $3500. Rolex. But some people gladly spend for the Rolex because it offers them something more than the ability to keep precise time.

Posted in Choosing & Buying Microphones, Microphone Fundamentals

Microphones Operate in a 3-Dimensional Space

StudioMicZone
3-Dimensional Microphone

Microphones are arguably the most critical piece of equipment in the studio because they pick up the vibrations in the air that we know as sound and convert it to an electrical signal that you can record manipulate and reproduce. They are the interface between the physical world of sound and the world of recorded audio. Any discrepancies in the fidelity of the microphone become part of your recording.

 It is essential to understand that microphones operate in a 3-dimensional space. It is also important to realize that there are no point sources of sound and that the sources we record have a physical size. The sound radiates from that whole physical source, and different sounds may radiate from different parts of it.

Consider an acoustic guitar. The guitar has a physical size of about 3 feet long, a foot and a half in width, and a thickness of six or more inches. Sound radiates from the whole body of the guitar, a different sound comes out of the soundhole, the strings radiate another sound, where the fingers pluck or strum the strings is one more sound, and the fingers of the other hand sliding along the fretboard produce a separate sound.

Imagine the microphone as a mixer that combines all of these sounds. Depending on the characteristics of the microphone, its directional pattern, and how we position it in 3-D space, it picks up a different mix of all these sounds. The signal coming out of the microphone cable is one-dimensional. Thus, the output of the microphone is the sum of all of those different sounds. They are processed as a single sound by any inline processing or in the DAW.

But we’re not done yet; our imaginary mixer has additional channels! Besides the different sounds coming from the guitar, there are sound reflections off of the floor and the ceiling. There’s sound reflected from the studio walls, noises occurring in the studio, and the sounds of the guitar player breathing and moving around. And if other instruments are being played at the same time, there is leakage from those. All of these sounds mix with the music from the guitar.

You can get more room sound by moving the microphone away from the guitar or less room sound by moving it closer. You can change the sound of the guitar by pointing your microphone at different parts of the guitar. And your choice of microphones affects the balance of all of these sounds. This whole mix then comes out of the microphone cable as a single monaural signal.

This signal coming out of the microphone cable is one-dimensional, a final mix. You can’t change the balance of the mix in post-production. Any effects or processing that you do affects that whole mix of guitar and room sounds. That is why microphone choice and positioning are so critical.

Posted in Microphone Fundamentals, Miking Techniques and Recording

Decibels

StudioMicZone

You must have a good understanding of decibels as well as a feel for the volume difference the term represents. Decibels are a term used to represent the intensity or volume of a sound, the gain of an amplifier, the amount of boost or cut of an equalizer, and many other areas of sound engineering that deal with sound intensity or volume. The first thing to remember about decibels is that:

Decibels are an expression of the difference between two different sound levels. Decibels are a ratio.

So, decibels are never an absolute number but the difference in sound level between two different signals. Decibels don’t have a specific value of their own.

When decibels denote a specific sound level or intensity, you must supply a reference level.

For example, if you measure the sound intensity at a Rock Concert or in your control room, you might specify “dB SPL” which is a measurement of sound pressure level where 20 micro pascals = 0 dB SPL. This reference is the average threshold of hearing, the minimal level of sound able to be detected by the human ear.  So when I measure a level of 90 dB SPL, I measure a Sound Pressure level 90 dB higher than the reference level of 20 micro pascals.

If you are looking at level meters on your console or DAW, the maximum level is usually 0 dB, and all levels are in negative dBs below that. The 0 dB reference number isn’t a specific voltage level, but it is the point at which the digital signal runs out of bits and starts to clip. You never want to exceed the “0” dB level.

There are a variety of references used in audio and equipment specifications, for example, dBA, dBV, and dBm. If you are looking at decibel values that denote specific levels, you need to understand what the reference level is.

Decibels are logarithmic.

In acoustics,  the range of intensities, pressures, and voltages are extreme, so it is convenient to use a more compressed set of numbers to express them. Decibels are thus logarithmic, and this logarithmic scale better matches the way that we hear.

The formula for determining the difference in decibels for two different powers of sound level is 

decibels = 10 log10(P1/P2)

So the difference in decibels between two powers, P1 and P2, is 10 times the logarithm of the quotient of P1 divided by P2. So if I have an amplifier putting out 10 watts of signal and increase the power to 20 watts, I have a 3 dB increase in power. If I have an amplifier putting out 100 watts of power and increase it to 200 watts, I still have a 3 dB increase in power. So, whatever the absolute values, doubling the power only produces a 3db increase in the sound.

If you are comparing voltages, rather than powers, the formula is:

decibels = 20 log10(V1/V2)

To get a feel for how much of a level change a dB is, consider this: 3dB is a noticeable change in volume when you are listening at average listening volumes. If you ask someone to turn down the volume a little, 3 dB is a readily noticeable change. The same is valid for raising the volume. Increasing the level by 3db is an easily noticeable slight increase.

If you are listening carefully at a loud volume in the studio, you can probably detect a 1 dB change in sound levels. Hearing, is of course, subjective and depends on program material and the absolute volume at which you are listening.

As part of your listening practice, you should listen to some recorded music and change the volume levels by different amounts so you can get a feel for how much 3 dB is, 6 dB is, 20 dB is, and so on.

Posted in Audio Fundamentals, Microphone Fundamentals

Phantom Power

StudioMicZone
Phantom Power (48V) Switch On Mic Preamp

The condenser microphones developed by Neumann and AKG in the 1940s and 1950s were an innovation for the quality of broadcast and recorded sound. But the capsule of the microphone required a bias voltage and an impedance transforming vacuum tube amplifier inside the microphone. The filament voltage and plate voltage requirements of the microphone, along with the bias voltage for the capsule, required a bulky power supply attached to the microphone through a heavy multi-conductor cable.

In the mid-1960s, the invention of the solid-state FET (field-effect transistor) paved the way for getting rid of the vacuum tube, and it’s associated hefty power supply. Neumann introduced its solid-state KTM microphone 1965. The microphone ran on batteries.

But shortly after, in 1966, with the KM 84, Neumann introduced Phantom Power.

Phantom powering was used for many years in the telephone service, and Neumann adapted it for its microphones. In a phantom power circuit,  the positive side of the direct current supply is applied through two same-value resistors to the two signal lines of a balanced audio connector (in modern equipment, both pins 2 and 3 of an XLR connector). The negative side of the power supply is connected to the ground pin of the connector (pin 1 of an XLR).  This is then connected to the cable shield or ground wire in the cable or both. Since the same voltage feeds each of the signal lines through matched resistors, no DC voltage is present between the signal wires. The resistors are of high enough value that they don’t affect the impedance of the audio circuit.

Neumann introduced the phantom-powered U87 in 1967.

I bought my first FET condenser microphones in 1974, a pair of Sony ECM22Ps. These microphones were capable of running off of phantom power, but I ran them off of internal batteries because very few mixers and preamps provided phantom power. By the mid-1980s, phantom power was standard on most mixers and microphone preamps.

There are three different voltage specifications for phantom power, P12, P24 and P48, 12 volts, 24 volts, and 48 volts, respectively. By far the most common voltage is 48 volts and this used on almost all new equipment. The current supplied to each microphone line should be at least 10 mA.

In the P48 voltage spec, the power is supplied to each balanced microphone line through 6.81K matched resistors. The spec recommends that the resistors be matched to within .1 %  To maintain excellent common-mode rejection on your microphone line.

USAGE OF PHANTOM POWER

  1. Phantom powering is not always implemented correctly or adequately, even in professional-quality preamps, mixers, and recorders, especially older equipment. So always check the voltage and current requirements of your microphones and the phantom power voltage and current on preamplifiers, mixers, and especially portable recorders.
  2. It is possible, but not likely that you can damage a ribbon or dynamic microphone by applying phantom power, especially if there is a wiring error or short in the cable. So why take a chance? Disable phantom power to devices that don’t require it.
  3. I’ve never seen it happen, but in rare cases, damage to a condenser microphone might occur if you plug it in with phantom power applied to the line. It is good practice to shut off phantom power when plugging and unplugging microphones.
  4. Some ribbon microphones and even a few dynamics are being built with internal preamplifiers and thus require phantom power, make sure you are aware of this.
Posted in Microphone Fundamentals, Miking Techniques and Recording

Microphone Polarity

StudioMicZone
Microphones Have Polarity

Microphones have “polarity,” and it needs to be correct. When a positive air pressure impinges on the microphone, a positive voltage should be present on pin two, relative to pin three on the XLR connector. In short, you want the speaker cone to be moving in the same direction as the microphone diaphragm

Polarity is sometimes incorrectly referred to as phase. Many microphone preamps have a polarity switch that is wrongly labeled “Phase” or might have the Ø (Phase Symbol) next to it. Changing the polarity of a microphone switches the phase 180° at all frequencies, but phase relationships between microphones are dependent on frequency and distance between the microphones.

If you have two microphones right next to each other, and if they have different polarities and you feed them into a mixer with the same gain on each channel, the outputs of the microphones cancel since they are 180° out of phase. But once you separate the microphones, the phase relationship between them becomes frequency-dependent and also dependent on the distance between the microphones.

The standard for microphone polarity is AES26-2001 (r.2006). AES26 states as a “recommended practice (their word for standard)” that pin 2 on the XLR connector shall drive the non-inverting input (or “+”) and pin 3 shall drive the inverting input or “-.” A positive pressure on the front of the microphone should produce a positive-going signal on pin 2 of the microphone.

If you are recording only one microphone, polarity isn’t important, but if you are using two or more microphones in a recording, a microphone that has reversed polarity can cause problems. On drums, it can cause a loss of low-frequencies and cause the drum with the reversed polarity microphone to sound hollow or tinny. If one microphone in a stereo pair has reversed polarity, there will be a loss of low frequencies, and the stereo perspective will be strange. Rather than sounds being positioned across the stereo field, they will sound like they are originating in your head. 

Before about 1986, there was no standard for the polarity of microphones; thus, older microphones might have reversed polarity. You should test all balanced cables in your studio for proper polarity using a cable tester or an ohmmeter. If you are using an ohmmeter, verify that pin one on one end is connected to pin one on the other connector, pin two on one end is connected to pin two on the other connector, and pin three on one end is connected to pin three on the other connector.

Once you have verified that all cables in your signal chain are wired correctly, plug the microphone that you wish to test into your DAW and set up to record. If there is a polarity switch on your preamplifier or in your DAW channel, make sure they are disengaged. Engage record and say the letter “p” into the microphone.  Expand the waveform of the recorded signal to see the beginning of it and make sure that the initial move is in the positive direction (up). If the waveform initially moves in the negative direction, either the microphone or something in the signal chain has its polarity reversed. You can reverse the polarity by reversing the wires going to pins 2 and 3 of the XLR connector of the microphone.

Posted in Microphone Fundamentals, Miking Techniques and Recording

Caring for Your Microphones

StudioMicZone

In most studios, microphones represent a significant investment. Microphones can also be somewhat delicate instruments, so to protect your investment, proper care is important. Microphones have a very thin diaphragm or a ribbon that moves with the audio vibrations in the air and converts those vibrations into electrical signals. The lighter the diaphragm or ribbon, the better it translates the air vibrations that are sound. Anything that impedes the motion of the diaphragm or ribbon will negatively affect the sound produced by the microphone.

In most studios, microphones represent a significant investment. Microphones can also be somewhat delicate instruments, so to protect your investment, proper care is essential. Microphones have a very thin diaphragm or a ribbon that moves with the audio vibrations in the air and converts those vibrations into electrical signals. The lighter the diaphragm or ribbon, the better it translates the air vibrations that are sound. Anything that impedes the motion of the diaphragm or ribbon negatively affects the sound produced by the microphone.

For the diaphragm or ribbon to do its job correctly, it must be open to the air to sense the pressure variations caused by sound waves. This means that the diaphragm is open to moisture, dust, and other contaminants in the air. Dust and residue from moisture that builds up on a diaphragm increase its mass and makes it harder for the diaphragm to respond to higher frequencies. In ribbon microphones, particles of dust can lodge in the narrow space between the ribbon and the magnets, impeding the motion of the ribbon. Fine iron particles are attracted to the magnets and be very difficult to remove.

Note the green corrosion on the capsule edge and the missing gold deposit on the diaphragm.

Operating a microphone without a pop filter when recording voice can allow moisture to build up on the diaphragm and permanently fuse the dust and impurities in the air to the diaphragm.

Here is a picture of a microphone capsule from a RØDE NTK microphone that has a heavy coating built up on the diaphragm, as well as corrosion of the capsule body from exposure to moisture. This microphone was likely used for voice recording and was operated without a pop filter for a long time. I tried to clean the capsule, but the corrosion had loosened the gold layer, and it took just a touch with a brush and some distilled water to remove part of the gold layer. This isn’t normal, and the capsule is beyond repair.

The late Lou Burroughs, co-founder of Electro-Voice Inc. was a well-known lecturer on the use of microphones. In his 1973 book Microphones: Design and Application he wrote about microphone maintenance:

Burroughs talks about the time he was touring a recording studio and saw several microphones lying on a dusty table waiting to be mounted on stands. He offered to the owner the opportunity of having all of the microphones serviced and cleaned so that he could research what happened to microphones in a typical studio. These were microphones with an average age of two years. When the studio closed for vacation a few weeks later, 28 microphones were sent to Burroughs, here’s what he found:

“First, curves were run; then all diaphragms and grilles were cleaned. Eight condenser microphones were received and the response of each was degraded. After cleaning, the two containing metal diaphragms returned to normal response.

The six metalized plastic diaphragm units improved considerably after cleaning, but the responses of no two were alike and none were equal to a new microphone of the same make and model.

Eleven dynamic microphones were examined and all were degraded. After the dust filters protecting the diaphragm were cleaned, eight of them returned to normal response. Three of another make had permanently warped diaphragms due to ferric dust accumulation on the diaphragm above the voice coil gap.

Of the nine ribbon microphones, all were found loaded with ferric dust and the ribbons stretched beyond repair. Here is a professional recording studio depending on a degraded microphone to reproduce quality sound.”

So what to do?

  1. ALWAYS use a pop filter when recording vocals of any type.

  2. No smoking in the studio. This isn’t the problem it was 20 or 30 years ago, but it is the quickest way to destroy a microphone.

  3. Cover microphones when not in use between sessions. When a session is done, replace the microphones in their cases. If you leave microphones set up, cover them.

  4. Always store your microphones in their cases when not in use.

  5. Most ribbon mikes should be stored with the ribbon vertical to prevent sagging.

  6. Make sure mike stands are heavy enough to support a given microphone without easily tipping over.

  7. Use desiccant packs in the microphone cases.

  8. Pack microphones properly for shipping and travel.

  9. Vacuum and dust regularly.

  10. If you need to do and remodeling or maintenance, put all microphones safely away in their cases and thoroughly clean the room before you bring them back out.

  11. Change your furnace filters regularly.

RØDE NT1000 Corrosion
Corrosion and pitting on RØDE NT1000 housing.

It is amazing the number of microphones that come across my workbench with large dents in the grill. I have repaired multiple microphones where the condenser capsule was snapped of its mounting post. This takes an immense amount of force to do and I can’t understand how it happened without trashing the outside of the microphone. And the most mystifying damage was a RØDE NT1000 that worked fine but the case was deeply pitted and appeared to have been splashed with molten metal. The only reasonable explanation was that someone was trying to record the sound of an electric welding arc and positioned the microphone a few inches from it.

Microphones represent a significant investment in most studios. Take care of them and protect your investment.

Posted in Hints and Tips, Microphone Accessories, Microphone Fundamentals, Miking Techniques and Recording, Other

Dynamic Microphones and Room Noise

StudioMicZone
Electro-Voice RE-20 Dynamic Microphone

Are dynamic microphones better at rejecting room noise than condenser mics? The short answer is “no.” There is also another misconception that condenser microphones have a better “reach” than dynamics; that is, they pick up distant sounds better. There is no such thing as “reach.” All microphones pick up sound the same way at a distance according to the Inverse Square Law, which we will discuss later.

But there are a couple of caveats. First of all, you need to be comparing microphones with the same pickup pattern. An omnidirectional microphone picks up more room noise than a cardioid. Also, a condenser microphone may have a better low-frequency response than a dynamic and pick up a little more low-frequency rumble.

First, there are a couple of terms you need to understand. The first is the signal-to-noise ratio, which is independent of microphone sensitivity. So if you are talking or singing into a microphone with the gain properly so that your meter is peaking around “0” dB, and you stop singing or talking and the meter reads -40 dB, the signal-to-noise ratio is 40 dB. In other words, the signal-to-noise ratio is how much louder the desired signal is than the background noise. In this case, the limiting factor on the signal-to-noise ratio dB room noise. In a very quiet room, the limiting factor in establishing the signal-to-noise ratio is the noise generated by the microphone and the preamplifier.

The other term is the Inverse-Square-Law, which states that the intensity of sound drops by 6 dB for each doubling of distance from the source to the microphone. Again, this is true for condenser microphones, dynamic microphones, and your ears. It’s a fundamental law of physics.

So, if you are one inch from the mike capsule and move to two inches away, the microphone output drops by 6 dB. If you move from two to four inches away, the signal level drops another 6 dB., and if you go from four to eight inches away, your signal drops another 6. But, the distance between the noise and the microphone hasn’t changed, and the noise level is constant. However, since your voice level has dropped by 18 dB, and since you moved from 1 inch to 8 inches away from the mike, you’ll need to increase the gain of the preamp by 18 dB to get your voice to be peaking around 0 dB. And by doing that, you raised the noise level by 18 dB.

So, one reason that a dynamic microphone might seem less sensitive to noise is that your lips are usually right on the microphone, maybe an inch away from the capsule since there is usually a built-in foam pop filter in the microphone. With a condenser, since you usually need to use a pop filter, you might be six to eight inches away from the capsule.

So, effectively you get a better signal-to-noise ratio because you can get closer to the dynamic. If you stay 8 inches away from both microphones, the signal-to-noise ratio should be about the same.

Posted in Choosing & Buying Microphones, Microphone Fundamentals, Miking Techniques and Recording, Podcasting

Growth of the Microphone Industry

StudioMicZone

The growth of the microphone industry and the growth of the home recording industry are entirely intertwined. The home recording revolution began in the 1970s with Tascam Model 10 console and Series 70 recorders. This equipment made home recording affordable and also spawned the opening of many small commercial studios. I opened my studio in 1973 and benefited from the new, lowcost, electret condenser microphones hitting the market.

At the beginning of the home recording revolution, there were only 10 – 15 manufacturers making studio-quality microphones. According to the Recording Hacks website, which contains probably the most comprehensive listing of studio-quality microphones on the web, over 151 manufacturers were making microphones for recording studios in January of 2020.

Frank Sinatra at Columbia Records recording on an RCA 44B ribbon microphone.
Frank Sinatra at Columbia Records recording on an RCA 44BX ribbon microphone.

The manufacturers got it right the first time. Classic microphones from the 1940s, 1950s, and 1960s were made exceptionally well and had a superb performance. The RCA 44BX and 77DX,  AKG C12, Neumann U47, U67, and U87 are still very desirable today and bring high prices, not only because they are collectible, but because they always produce excellent results. These classic microphones were used on many hit recordings, not primarily by choice but because they were the only ones available. At that time, the selection of microphones was minimal.

Progress in microphone design over the past 75 years has been one of evolution rather than revolution, with only a few significant innovations.

The first notable innovation was the invention of the FET (field effect transistor). Condenser microphones required a preamplifier in the microphone body because of the high impedance of the capsule. A vacuum tube and the associated high-voltage and filament power supply were needed for that preamp.  The FET allowed manufacturers to get rid of the large high voltage tube supply and miniaturize the components in condenser microphones. Vacuum tube condenser microphones were replaced by new FET microphones that were battery powered.

The next innovation was the implementation of phantom power to power the microphone over the standard 3-wire balanced cable. The expensive batteries became an option and soon disappeared as phantom power became the norm in the 1980s.

The innovation of the electret condenser microphones allowed for smaller microphones because their permanently polarized diaphragm eliminated the need for an external bias power supply. The elimination of the bias supply resulted in a cost reduction and a smaller microphone. Lavaliere microphones got more compact, and low-cost electret condenser microphones hit the rapidly growing home recording market. My first condenser microphones were a pair of Sony ECM-22P microphones I purchased in 1973. They still work well.

The steady progress in dynamic microphones and ribbon microphones was given a shot in the arm with the discovery of the metal compound, neodymium. Neodymium was discovered independently by General Motors and Sumitomo Special Metals in 1984. Magnets made from this metal are the material of the smaller magnets and higher outputs in dynamic and ribbon microphones because of their intense magnetic fields. Neodymium spawned a new generation of more compact ribbon and dynamic microphones.

During that time there was a continued improvement, re-design and re-engineering that produced a continuous forward movement in the quality and features of studio microphones.

Seventy-Five years of design experience plus precision CNC machining equipment automated the production of many microphone parts, bringing the cost down and providing considerably improved quality control. The takeaway here is that because of significantly increased sales volume and lower automated manufacturing cost; there is a greater variety of quality microphones with many options available at reasonable prices than ever before.

Posted in Choosing & Buying Microphones, Classic & Antique Microphones, Microphone Fundamentals, Other

My First Microphone Build

StudioMicZone

Microphone kits are readily available these days, at least for condenser and ribbon microphones, but that certainly wasn’t the case in the early 1960s. I was what today we would call a geek in my younger years, so when I saw the ad for the American Basic Science Club kits in the back of an electronics magazine, I talked my parents into subscribing me to the set of 8 monthly kits for my tenth birthday.

James S. Kerr created the American Basic Science Club in 1957 and operated the company into the early 1980s. The kits were elegantly designed so that you could reuse many of the items for different experiments and it certainly was a wonderful introduction to science and technology with a lot of emphasis on learning the basic principles of electronics, optics, and many other areas.  The ad below shows all of the different experiments that one could do and the kits evolved and expanded over their lifetime with the addition of an analog computer later on.

American Basic Scienc Club magazine ad from the early 1960s.

American Basic Science Club Ad from the early 1960’s.

These kits contained a lot of electronics projects with vacuum tube circuitry. Mine used three octal tubes, but later kits used miniature tubes. The company never made the transition to solid state circuitry.

One of the projects was an AM radio transmitter, and that project required a microphone, so included in the kit were parts to build a carbon microphone from scratch. I built it, it worked, and so began my saga with microphones and audio. I don’t have any of the pieces of the original kits except maybe for the tuning capacitor.

A few years ago, the nostalgia bug bit and I started buying some of the American Basic Science Club kits on eBay as they showed up for sale, fortunately before the prices shot up. I managed to acquire most of the whole set at that time. I keep some of the pieces on display, but most of the kits are still in their original boxes.

Parts and instructions for the 1960's carbon microphone kit. from American Basic Science Club.

Parts and instructions for the 1960’s carbon microphone kit.

 Metal diaphragm and capsule of carbon granules.

Metal diaphragm and capsule of carbon granules.

I thought it might be fun to construct that microphone again, so I started rummaging through the boxes and managed to find all the pieces to assemble the same mike that I had built 55 years earlier. The instructions were very basic, and it was certainly a little bit of a challenge. I wondered how I was able to accomplish it when I was only ten years old, but I probably had a bit of help from my dad who could build just about anything.

A carbon microphone works as a variable resistor. Carbon grains are loosely held in a small chamber between two metal contacts. One of the contacts is attached to the diaphragm of the microphone, and the vibrations of the diaphragm from sound move the carbon granules and vary the resistance at the vibrational rate. A small DC bias current is passed through the microphone, and thus a varying voltage is generated. If you hook a carbon microphone, a headphone and a battery in series, you’ve built a simple telephone.

Cavity in the carbon microphone handle that holds the carbon granules, ready to be filled.

Cavity that holds the carbon granules, ready to be filled.

The body of this microphone was stamped out of masonite. The hole in the handle was the chamber that held the carbon particles. A tinfoil layer covered the bottom of the hole and contacted the carbon granules. A screw head attached to the diaphragm made contact with the other end of the granules.

There were few instructions, and I needed to rely on the drawing for most of the assembly. The screw head from the diaphragm passed through a little square of plastic bag that was glued across the top of that cavity to keep the carbon granules from leaking out. The type of glue wasn’t specified, and I kept choosing the wrong kind and softening the piece of plastic bag and having the carbon grains leak out. I finally used a piece of double-stick tape to attach the plastic bag, and ended up with a non-leaking microphone.

I applied a 9V bias to the microphone through a resistor and coupled the signal from the microphone to the line input of an amplifier through a capacitor.

And just like the first one, I had a working microphone. Not exactly hi-fi, not even telephone quality, but able to reproduce understandable speech. I still find it amazing that you can build a working microphone with the simplest of parts and basic hand tools.

The completed, working, American Basic Science Club carbon microphone kit.

The completed, working, carbon microphone kit.


Posted in Microphone Fundamentals, Other | Tagged Build Microphone, Carbon Microphone

The Three-To-One Ratio Rule

StudioMicZone

There are a few rules-of-thumb in recording that are useful and time-saving. The three-two-one ratio rule is one of those that will assist you when you are setting up a recording session for multiple musicians, and it’s just as useful if you are miking a live concert.

One of the essential books for understanding microphones is Microphones: Design and Application, a 1974 book written by Lou Burroughs, one of the founders of Electro-Voice. This book is an excellent course in the basics of microphone usage, both in sound reinforcement recording.

One of the principles developed by Burroughs was the three-to-one ratio rule.

This rule is an empirical rule determined by listening tests for microphone placement and sets a minimum distance between microphones to avoid degradation in the sound from a given source. So, it is the minimum distance between microphones to keep noticeable bleed-through and phase problems under control.

The rule is: The distance between any two microphones must be at least three times as great as the distance between the microphone and the source of sound which it is to pick up.

So, for example, if you are miking a violinist and a cellist and the microphones are 2 feet away from their instruments, the microphones should be separated by a minimum of about 6 feet.  I also believe that the rule implies that the sources will be of similar volume levels. Recording a screaming guitar amp in the same room with a quiet acoustic guitar is probably not going to work.

Remember, this is a guideline, not a precise law. But, keeping this in mind should make setup for sessions easier and help you avoid bleed-through and phasing problems between microphones.

Posted in Microphone Fundamentals, Miking Techniques and Recording

Visit us on:

Search

Categories

  • Audio For Video
  • Audio Fundamentals
  • Choosing & Buying Microphones
  • Classic & Antique Microphones
  • Hints and Tips
  • Microphone Accessories
  • Microphone Fundamentals
  • Microphone Modifications
  • Microphone Reviews
  • Microphone Teardown & Repair
  • Miking Techniques and Recording
  • Mixing
  • Monitoring and Listening
  • Other
  • Podcasting
  • Software
  • Studio Construction

Archives

  • March 2020
  • February 2020
  • January 2020
  • December 2019
  • November 2019
  • October 2019
  • September 2019
  • August 2019
  • July 2019
  • June 2019
  • May 2019
  • April 2019
  • March 2019
  • February 2019
  • January 2019
  • December 2018
  • October 2018
  • August 2018
  • June 2018
  • April 2018
  • February 2018
  • December 2017
  • November 2017
  • September 2017
  • January 2017
  • December 2016
  • November 2016
  • October 2016
  • August 2016
  • July 2016
  • June 2016
  • May 2016
  • February 2016
  • January 2016
  • December 2015
  • November 2015
  • October 2015
  • September 2015
  • August 2015
  • July 2015
  • June 2015
  • May 2015
Copyright © 2025 by Norwest Communications Inc. All Rights Reserved. - Weaver Xtreme Theme
↑